Tuesday, December 28, 2010

Baileys Chocolate Chip Cheesecake

I'm not really a dessert person, but this cheesecake is sooo good it's my favorite dessert! It's my go-to dessert when I want to go all-out. It's rich, not too sweet, has the texture of a creamy cheesecake and the flavor of Baileys Irish Cream, chocolate chips and a graham cracker crust.
I'm not sure where I got this from, otherwise I'd give credit where it's due. This can be made ahead of time and keeps well in the refrigerator. This is much taller than your standard pie-sized cheesecake so it can serve a good sized party.

Crust:
2 Cups graham cracker crumbs (Each packaged 'Brick' of crackers is a bit over 1 cup each)
1/4 Cup Sugar
6 Tbsp. (3/4 stick) butter, melted

Filling:
2 1/4 lbs (4 1/2 - 8oz bricks) Cream Cheese, room temperature or microwave until soft
1 2/3 cups sugar
5 eggs, room temperature
1 cup Baileys Irish Cream
1 Tbsp. vanilla extract
1 cup semisweet chocolate chips

Cooking Instructions:
For Crust:
Preheat oven to 325F.
Coat 9" diameter springform pan with nonstick vegetable oil spray.
Combine graham cracker crumbs and sugar in pan.
Stir in butter.
Press mixture into bottom and 1" up sides of pan.
Bake until light brown, about 7 to 10 minutes.
Maintain oven temperature at 325F.

For filling:
Use electric mixer to beat cream cheese until smooth.
Gradually mix in sugar.
Beat eggs in one at a time.
Blend in Baileys and vanilla.
Scrape down edges of bowl and mixing blades, and remix to ensure consistent texture and flavor.

Sprinkle half of chocolate chips over crust.
Spoon in filling, taking care to not disturb placement of chocolate chips.
Sprinkle the remaining chocolate chips over the top of filling.
Bake cake until puffed, springy in center and golden brown, about 1hour 20 minutes.
Cool cake completely.


For Taste Sake:
Pay attention when assembling the springform pan - you want the 'lip' to face down so that you can slide the finished cake off of the disk, I actually assemble it with a piece of parchment paper in place, when it's cooled I can pull the paper and cake onto my cake stand, then slip an icing knife between the crust and paper, use the icing knife to hold the cake in place while I pull the parchment out from under the cake leaving just the cake on the cake stand.

Cake my crack when puffy, crack(s) will close as cake cools and shrinks. Some cooks prefer to place pan of boiling water in oven with the cake to keep humidity up lessening crack or wrapping the cake pan in aluminum foil, ensuring the bottom and sides are water tight, placing the cake pan, aluminum foil assembly in another larger pan,adding boiling water to the outer pan, then cooking. 

The bottom of a small cup or measuring cup can be used to press the crumb mixture in place and up the sides of the pan.

To top the cake:
Chocolate chips can be placed symmetrically on top of the filling before cooking, giving a nice presentation.


Coffee Cream Topping
1 cup chilled whipping cream, 2 Tbsp. Sugar, 1 tsp. instant coffee powder.Beat cream, sugar, and coffee powder until peaks form. Spread over cooled cake, garnish with chocolate curls.

Amaretto Topping
Dissolve 1 pkt. Knox Gelatin in 1/2 cup Amaretto and bring to a boil as it starts to cool it can be spread over top of cake while it's still in the springform pan it will cool to an translucent amber gel.

Monday, December 13, 2010

Homemade Raviolis

One of the best things about Homemade Raviolis is that you have complete control over how they’re made. There are three components to consider when making raviolis; filling, dough, and sauce.

The filling is limited only by your imagination. Meat, seafood, vegetables, mushrooms, and cheese is just a start.

Meat Raviolis fried in Olive Oil, with herbs and shallot
The pasta dough is very important. It has to stretch over the filling, stick to itself and hold up to a great amount of handling. After years of struggling with various recipes, I finally found one by Tyler Florence on the Food Network. My early batches of raviolis were made completely by hand, now I try to automate the process as much as possible. Currently I use a pasta roller attachment for my Kitchenaid. The Ravioli maker, is a cast aluminum rack of 12 holes surrounded by zigzag  borders, with a corresponding piece of plastic with 12 dimples that stretches the dough enough to make pockets to put the filling in.
The Kitchenaid pasta roller attachment will make a long sheet of pasta that fits over the ravioli maker's rack, The plastic tray fits over the rack, making dimples in the dough, fill the 12 dimples, then cover the rack with another sheet of pasta, run a rolling pin over the assembly. The pressure from the rolling pin, pinches the dough together , cutting it on the zigzag borders, making 12 raviolis.
  All of the automated equipment isn’t necessary , dough can be made by hand, and rolled out with a rolling pin or hand cranked pasta machine, dollops of filling can be laid out on a sheet of pasta on the counter, the second sheet can be laid on top of the other and the dull side of a butter knife can be used to press and cut the dough.

When rolling out the dough, keep in mind that the dough is doubled over, so to keep from minimizing the taste of your filling, keep the dough as thin as possible.

Whatever filling you decide to make, take into consideration that the filling is surrounded by dough, so often times it pays to over season the filling, especially meat filling that’s also going to be served in a bold sauce.

Sauce can be homemade, store bought, or fixed up store bought. Red sauce is traditional, but for variety consider, a pesto sauce or in the case of sea food ravioli, try an alfredo, white wine or cheese sauce . One of my favorite ways to enjoy homemade raviolis is with no sauce at all. In a large pot of lightly salted boiling water drop frozen raviolis, most will sink, when they start to float they are getting close to done. In a large fry pan, sauté some shallot, maybe some mushrooms in a healthy dose (more than you’d typically use) of Extra Virgin Olive Oil. Off to the side have some chopped herbs (Italian Parsley, Oregono, Rosemary, sage Garlic) Once the raviolis are close to done and the shallots are translucent, drain the raviolis and put them into the sauté. As the raviolis start to crisp up, put your fresh herb mix in the pan and finish cooking to the desired brown, crispness. Serve with shredded parmesan cheese.

Dough Recipe:
http://www.foodnetwork.com/recipes/tyler-florence/pasta-dough-for-ravioli-recipe2

Raviolis keep very well frozen – care must be taken that they don’t break!
I have this odd piece of Tupperware the top and bottom are the same depth, it’s wide and shallow enough to hold 20 raviolis in a 4 x 5 grid, I use the thin plastic sheets used as semi-disposable cutting boards, that I cut to fit inside the container. I put 20 raviolis down, a sheet of plastic on top of them, another 20 and another plastic sheet – I can fit 140 Raviolis (12 dozen less 4) in the container and freeze them. A handy way is to lay the raviolis out on a cookie sheet, freeze them individually (if they stick to the cookie sheet, just gently drop the cookie sheet from a inch or two above the counter)  then store them in a resealable bag or plastic ware. 

Meat Filling
Meat Raviolis fried in Olive Oil, with herbs & shallot, Parmesan
1 ½ lbs Ground beef
4 table spoons minced Italian Parsley
2 table spoons minced Rosemary
2 table spoons minced Oregono
2 table spoons minced Sage
2 table spoons chopped garlic
½ to 1 cup red wine
¼ cup Worchester sauce
Salt & pepper to taste
Brown the meat in a large skillet (do not pour off the grease), add the remaining ingredients. Continue to cook the meat until the liquid disappears, continue to stir the meat mixture until it becomes dry and starts to brown. To make the ground meat easier to work with I run it through a food processor chopping it finely.

Sunday, December 5, 2010

Homemade Granola

Even people that don't like Granola like this!

The BEST part of of Homemade Granola is that you modify the recipe to suit your taste.
It's very simple to make and keeps fresh on the shelf for about a week. Eaten dry or in milk.

3 Cups Oatmeal Old Fashioned Slow Cook style
1 Cup Nuts - your favorite
1/4 Cup Vegetable Oil
1/4 Cup Brown Sugar
1/4 Cup Maple Syrup
pinch of salt
1 Cup Raisins

Mix Oats, Nuts, Oil, Sugar and Syrup in a bowl, spread out on large cookie sheet that's been sprayed with non-stick spray, and bake @250 for 1 1/2 hrs - turning every 20 minutes.
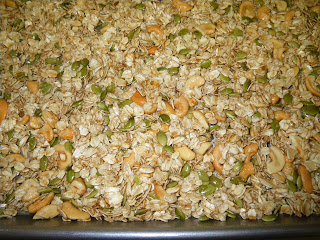
Oats, Cashews, Pumpkin Seeds - Golden Raisins were added later
Let cool and add 1 cup Raisins
Keep in Zip lock bags.

For Taste Sake
Oatmeal - The Old Fashioned Oatmeal will give you the largest flakes - the only difference between the Old Fashioned  Oats and the Quick Cook is that the quick cook has been cut into smaller pieces.

The nuts can be anything you like, Cashews work well as does Walnuts, Pecans, Almonds, etc. This process toasts the nuts - improving the flavor. If you use salted nuts then you can omit the pinch of salt.

Seeds can also be used, Pumpkin, sunflower (without the shell), etc. Raw ones can be added 1/2 or 3/4 the way through the toasting process - depending on their size, or if they're  already toasted - add them at the end with the raisins.
 
Adding Raisins - my favorite for this granola is the Golden Raisins (made from White or Green Grapes), the regular raisins go good, as well as craisins (dried cranberries) or any dried fruit you prefer.

The Syrup used is the standard "Maple Flavored" - REAL Maple syrup does kick it up a notch!

Serving suggestions - Dry, in milk, in yogurt, over ice cream, with berries or pomegranate seeds, roll a ball of peanut butter in the granola then dip in melted chocolate.