Showing posts with label Snack. Show all posts

Sunday, January 11, 2015

Teriyaki and Garlic Glazed Edamame

Teriyaki and Garlic Glazed Edamame!

Teriyaki and Garlic Glazed Edamame makes a great appetizer or finger food side dish.

This quick and easy recipe will have you and your guests licking their fingers, wanting more. 

Edamame are immature soybeans in the pod. Commonly found in Asian dishes. I've been in several
Teriyaki garlic glazed Edamame
Japanese Restaurants that serve a bowl of steamed edamame to munch on when you are seated. They're a healthy snack, and I commonly turn to them when I'm making finger food for dinner. It's much easier to put down your chicken leg and pick up an edamame pod, extract the beans, and go back to your chicken leg. My favorite recipe for them is with a Teriyaki and Garlic glaze. Edamame in the shell are often found in the frozen vegetable section of grocery stores. One pound should serve four people as a side dish or more people as an appetizer. The can be server warm or cold.

1 Pound Edamame in the shell
1/4 to 1/2 cup of  broth (Vegetable, Chicken, or Beef) or water
2-3 cloves of garlic minced
1/4 to 1/2 cup Teriyaki Sauce

In a large sauce pan over medium heat, put the edamame in the pan with the broth or water - this
Teriyaki garlic glazed Edamame in the pan
liquid is to simply help thaw the edamame, after a few minutes when it looks like the edamame is starting to thaw, add the Teriyaki sauce and garlic. Stir occasionally to cote the pods, when the broth or water has evaporated and the Teriyaki sauce starts to thicken and become sticky. They're done! Each Teriyaki sauce is different - besure you buy Teriyaki 'Sauce' and not marinade which is much thinner. As the liquid starts to evaporate, start turning down the heat so you can gauge the thickness of the sauce and prevent burning.
Serve hot or at room temperature. An Asian style bowl or small dish adds to the theme. They're eaten by grasping the pointy end of the pod, placing the entire pod in your mouth and pulling the pod back out of your mouth while gently clamping down on the pod enough to cause the pod to split and the beans to remain in your mouth.
Finger Food Dinner: Teriyaki garlic glazed Edamame, breaded pork medalions, grilled trout, crab quesadilla.
An empty bowl for discarding the pods is a handy addition.


Thursday, January 30, 2014

Emulsified Green Chili Salsa


Green Chili Salsa
Salsa Verde - An Emulsified Green Chili Salsa
This recipe came from my attempts to make a Salsa Verde that I found at Dos Coyotes Border Cafe their Green Chili Salsa is one of my favorites. While I still don't think I 'Nailed it' I do believe I've made some batches that were better! This recipe will give you a fresh, light, exotic green salsa with a hint of heat.  As with most of my recipes, I strive to give you the basic building blocks of the recipe, so that you can make it your own my changing it. This recipe will give you a fresh tasting, rather exotic salsa with just a hint of heat.

Green Chili Salsa

Salsa Verde Ingredients:

2 Poblano or Pasilla Peppers - these are large fat mild Chili Peppers
2 Jalapeno Peppers - these are  small smooth skinned hotter Chili Peppers
1/2 Large onion
1/2 cup Canola or other vegetable Oil
1 Bunch Cilantro leaves stripped from the stems

A Chili by any other name? There's lots of confusion concerning the names of Chilis: Poblano, Ancho, Pasilla. Here's a picture of the ones I use http://www.worldcrops.org/images/content/Poblano_peppers_in_S._Deerfield_-_550.JPG

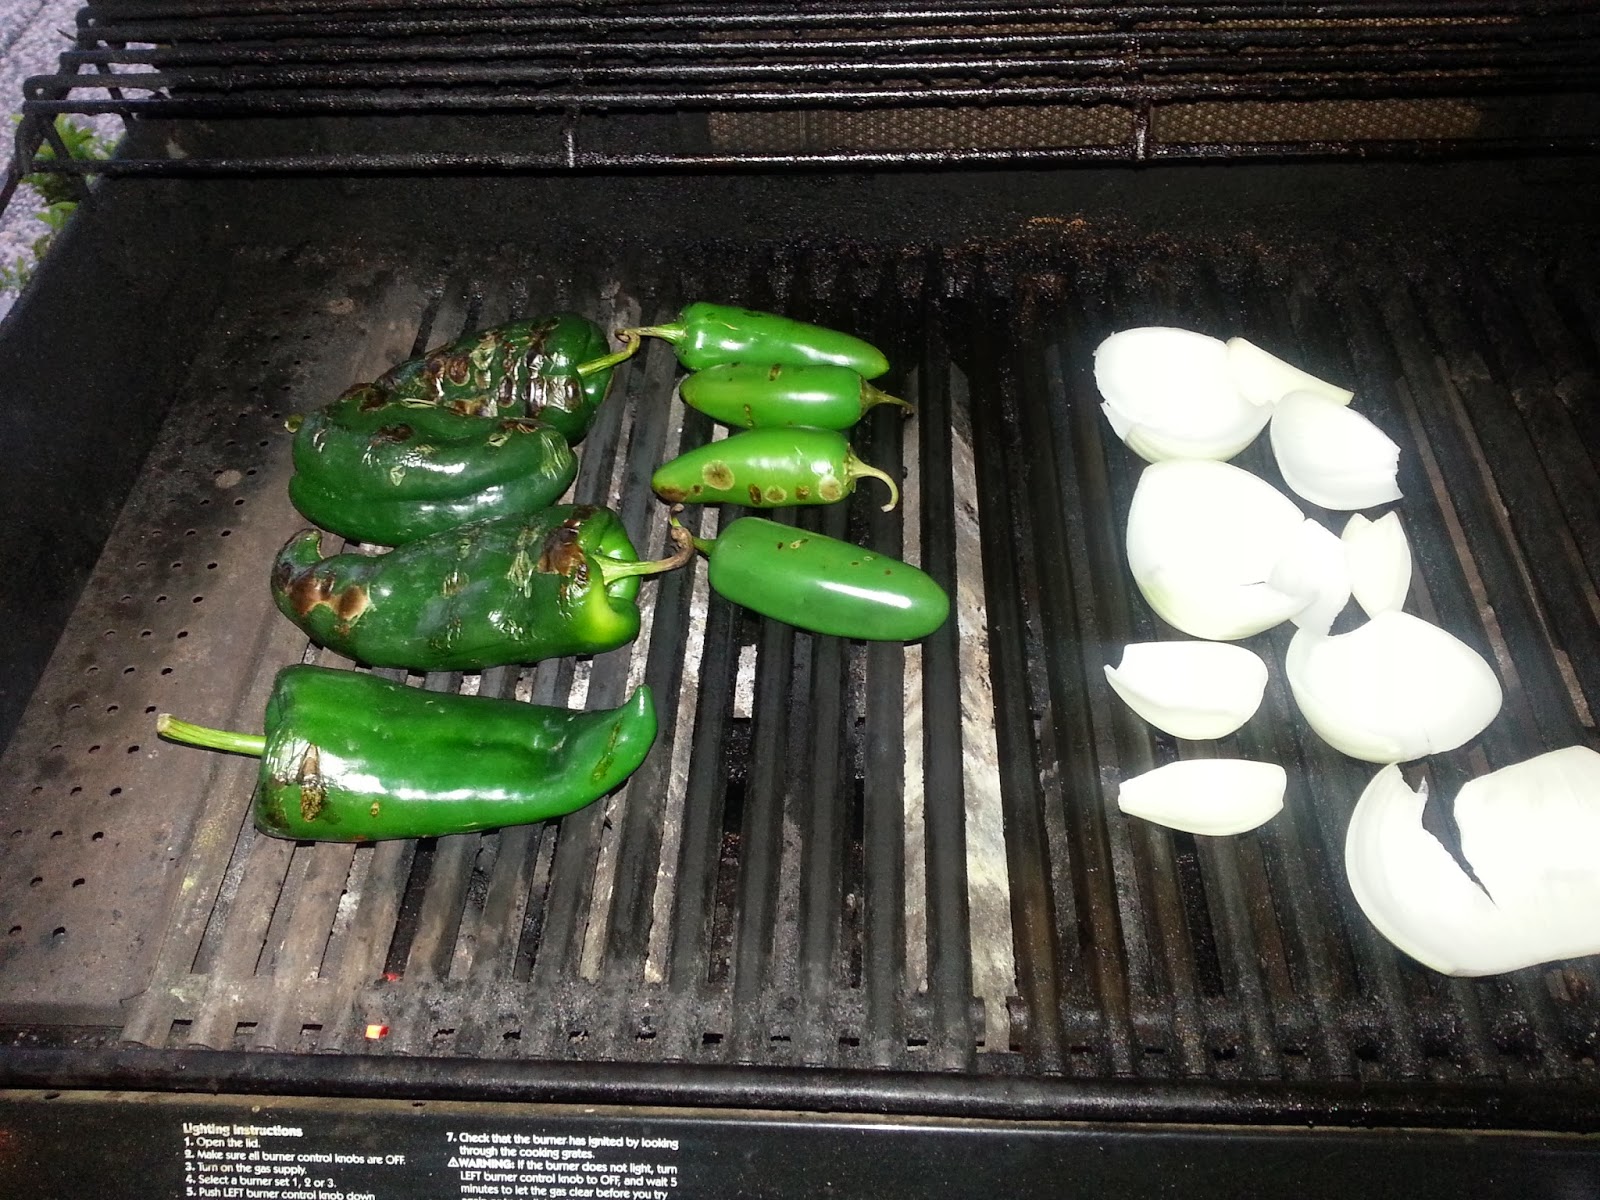
Roast the Peppers and onion, I like to separate the layers of the onion
Green Chili Salsa
Once the pepper's skins have been scorched - place them in a closed plastic container to steam and cool down. Once the peppers are cool enough to handle, remove the tops, skin and seeds.

Place the oil in the blender and either add each ingredient separately between bursts of blending, or turn on the blender and add the Onion, Peppers (I cut them into strips), and cilantro.

Serve it with traditional Tortilla Chips, Crackers, as a vegetable dip, and as a topping for your favorite Mexican dish.

For Taste Sake

Green Chili Salsa
It's the emulsification of the oil and the moisture in the peppers and onions that gives the salsa it's unique color

The oil does add to the flavor, so experiment with different oils.

Add Salt and pepper to taste

When adding salt to this recipe, remember to take into account the amount of salt that may already be present on the chips that you're serving it with - be sure to taste it with a chip and not just with your finger

Roasting the onion releases the gas that gives onions their 'bite', so if you like the bite of raw onion, don't roast the onion.

Roasted tomatillos add great flavor - cut them in half or quarters and roast them with the Chili Peppers and onion - you'll have to add extra jalapenos to keep the tomatillos from diluting the heat.

You can also throw a raw garlic clove or two in the blender with the other ingredients to step up the flavor.

Serve it with traditional Tortilla Chips, Crackers, as a vegetable dip, and as a topping for your favorite Mexican dish.

If you have a really good blender, you don't have to strip the cilantro leaves from the stems - the blender will pulverize the stems.

The Chili Peppers can be roasted on a BBQ grill, on a gas stove burner, gas or electric oven broiler, turn them often until the skin has been scorched and blistered


Wednesday, September 19, 2012

Fred's Famous Fresh Salsa

The key to this recipe is the fresh ingredients - you can vary the recipe to your own liking. Experiment and make it your own.


Ingredients

10 Chili Peppers (Anaheim, Sweet Italian, Banana,  Pasilla) - Roasted & peeled
1 Medium Onion - minced
4 Medium to Large Meaty Tomatoes (Beefsteak, Plum, Shady Lady, Better Boy) - diced
1 Bunch Cilantro - chopped
Coarse Salt, Cracked Pepper, Minced Garlic or Garlic Powder to taste

The peppers are the most time consuming aspect of this recipe - they can be prepared ahead of time and refrigerated.
The chili peppers have a very thin, very tough skin on them that should be removed. Some sort of flame makes it easy - BBQ, Gas Broiler, Gas Stove, Blow torch. The chilis can be roasted in an oven but it's not as effective. Place the chilis over direct flame and rotate them until the skin becomes charred and blistered as much as possible. Remove the peppers from the flame into a plastic or paper bag, close the bag and let them sweat, steam until they're cool enough to handle. The skin should now be easy to remove by hand.
With a sharp pairing knife, cut off the top of the pepper, slice it open from the opening to the tip and lay it open. Scrape out the seeds. If you are storing the peppers for later use, simply storing them in a bowl will result in a bowl of slimy peppers. I place a saucer upside down in the center of a medium or large plate. Stack the peppers on top of the saucer and wrap in saran, and store in the refrigerator. The slime will drain it's way to the under plate, away from the peppers.

I like this style of salsa rather dry and chunky. So I dice the Tomatoes, Onions, and peppers on the bigger side. Chop the Cilantro well, you can pull the leaves off and chop them, but you can also getaway with bundling it up tightly and cutting 1/8" slices off the bundle. Avoid chunks of stems in your salsa.

When dicing the tomatoes, I put the cutting board on a slant and let the juice run into the sink. I only use the meat of the tomato, discarding the seeds and juicy portion surrounding them.

So mix all the ingredients together, add salt, pepper (preferably fresh cracked), minced garlic or garlic granules or powder to taste. The salt will draw even more moisture from the produce - I like to drain the salsa when juice starts to accumulate. You don't have to throw the juice away - it's great in Bloody Mary's - I hear it cures hangovers
Serve with tortilla chips, over dishes like grilled Salmon etc.

For Taste Sake
Fresh minced garlic might be too much for some people - the Minced Garlic in a jar is less potent.
Experiment with different types of onions, Yellow, White, Brown, Red, Sweet Walla Walla, Maui, Torpedo) Torpedos are my favorite they can be spicy.
A great addition to this salsa is corn - either freshly cut from the cob or roasted first.
Fire roasted Tomatoes (like you did with the peppers) makes a great variation.

This salsa is at it's very best when made fresh but tomatoes and chili peppers aren't always available - you can experiment with canned chopped tomatoes (some are available with Italian or Mexican spices) and canned chopped chili peppers.


Sunday, January 2, 2011

Better Than Garlic Bread


Better than Garlic Bread. There's just SOME meals I have to have a good bread with - such as seafood. I used to reach for Garlic Bread on those occasions - homemade or store bought it was all good...... UNTIL I discovered this way of preparing, serving bread. Almost any bread will do but for the best results, pick a rustic artisan bread, one with small holes works best, my favorite is Puglasese made at a grocery store that we frequent. Next you want the very best Extra Virgin Olive Oil that you can find, a specialty salt like Pink Salt or Grey Salt, and a pealed clove of garlic.


Cut the bread in half lengthwise.


Toast the bread thoroughly (either in an oven, toaster oven or on a BBQ grill) I think toasted on a BBQ grill with grill marks is the most impressive with a little added kick of smoky flavor but it does require some extra skill to keep from burning the bread.

As soon as the bread is well toasted, take the garlic clove an rub it all over the exposed toasted inside of the bread. The toasted bread acts as sandpaper and the garlic will rub off onto the bread. Take special note of your and your guest's taste for garlic - don't over do it.


Next use a Silicone Brush to spread the Extra Virgin Olive Oil generously over the exposed toasted inside of the bread.


Sprinkle a pinch of Pink Salt or Grey Saltover the bread, slice and serve.


For Taste Sake
Pink Salt and Grey Salt aren't as salty as table salt - they have a 'mineral' taste to them - enhancing the flavor.

When you slice the bread in half, lengthwise, pay close attention to the edges of the bread, especially if you're going to grill it. Often times the bottom half is well proportioned but the top half's edge may be quite thin and subject to burning - it's a good practice to trim the thin edges back before toasting.

A Silicone Brush is best at spreading the Extra Virgin Olive Oil over the bread - the silicone will not leave any bristles on your food, will withstand high cooking temperatures, and cleans easily because the bristles will not absorb food.


Sunday, December 5, 2010

Homemade Granola

Even people that don't like Granola like this!

The BEST part of of Homemade Granola is that you modify the recipe to suit your taste.
It's very simple to make and keeps fresh on the shelf for about a week. Eaten dry or in milk.

3 Cups Oatmeal Old Fashioned Slow Cook style
1 Cup Nuts - your favorite
1/4 Cup Vegetable Oil
1/4 Cup Brown Sugar
1/4 Cup Maple Syrup
pinch of salt
1 Cup Raisins

Mix Oats, Nuts, Oil, Sugar and Syrup in a bowl, spread out on large cookie sheet that's been sprayed with non-stick spray, and bake @250 for 1 1/2 hrs - turning every 20 minutes.
Oats, Cashews, Pumpkin Seeds - Golden Raisins were added later
Let cool and add 1 cup Raisins
Keep in Zip lock bags.

For Taste Sake
Oatmeal - The Old Fashioned Oatmeal will give you the largest flakes - the only difference between the Old Fashioned  Oats and the Quick Cook is that the quick cook has been cut into smaller pieces.

The nuts can be anything you like, Cashews work well as does Walnuts, Pecans, Almonds, etc. This process toasts the nuts - improving the flavor. If you use salted nuts then you can omit the pinch of salt.

Seeds can also be used, Pumpkin, sunflower (without the shell), etc. Raw ones can be added 1/2 or 3/4 the way through the toasting process - depending on their size, or if they're  already toasted - add them at the end with the raisins.
 
Adding Raisins - my favorite for this granola is the Golden Raisins (made from White or Green Grapes), the regular raisins go good, as well as craisins (dried cranberries) or any dried fruit you prefer.

The Syrup used is the standard "Maple Flavored" - REAL Maple syrup does kick it up a notch!

Serving suggestions - Dry, in milk, in yogurt, over ice cream, with berries or pomegranate seeds, roll a ball of peanut butter in the granola then dip in melted chocolate.