Showing posts with label Seafood. Show all posts

Tuesday, April 9, 2013

Thai Tilapia

Thai Tilapia - Like Thai Food but don't know how to make it at home? Do you like Tilapia but
you're tired of the same old recipes? Here's an easy to make, yet exotic tasting dish that you can make at home and wow your friends and family with!

Ingredients 
2 Large or 4 small Fillets of Tilapia (for 2 people - can be doubled with the same amount of ingredients - for more people add appropriate amount of listed ingredients)
1 Can of Coconut Milk
1 Green onion chopped
1 or 2 Tablespoons of Fish Sauce
4 large Basil leaves (Regular or Thai Basil)
2-3 Sliced Mushrooms
1 Schllot sliced (2-3 tablespoons of onion can be substituted
1 Jar Green Curry Paste

1 Cup Uncooked Rice

Start cooking the Rice First
Bring 1 1/2 Cup of water to a boil in a covered pot. Add 1 cup rice, stir, cover and lower the heat as low as it will go - just enough to keep it warm (it's best if you don't open the lid for 20 min or so.

In a large skillet (one with a cover is preferable but not necessary) pour the can of coconut milk in and start with a medium high heat. To keep from contaminating the curry paste, use 2 spoons, one to take the curry paste from the jar and tap it on the side of the skillet to drop the paste in the milk. Use the other spoon to stir the paste into the coconut milk. Add the Green Curry paste to taste - typically the Green Curry Paste is sweet but too much can still give you some heat! Keep adding paste and tasting the milk/curry mixture until it's to your liking. For reference I typically add around 3 teaspoons. Add the shallot, green onion, mushrooms, fish sauce, and sliced basil to the mixture, when it starts to simmer, turn the heat down to medium and add the fillets one at a time, making sure they get good contact with the mixture. As the fillets simmer, gently move them around in the pan to ensure they're all cooking evenly. When the fillets turn opaque/white all the way through - they're done! The rice should also be ready.

This dish can be served on a plate or in a bowl. Fish can be served beside or on top of the rice, spoon the vegetables and coconut milk mixture on the rice.

For Taste Sake
Basil is a delicate herb - it needs to be sliced or ripped just before you put it in the mixture, otherwise it will turn black while it waits to be put in the sauce.

Other fish can be substituted - Sawi, Basa, Perch, etc. thin white fish is best.

Peas, green beans or Broccoli make great side dishes.

This dish can also be prepared in the oven, in a Pyrex dish, 350 degrees.


Wednesday, February 29, 2012

Salmon Chowder

Here is a quick, hearty, belly warming soup that you can make in one pot, with leftover salmon. It's worth cooking salmon just to make this chowder also! Other fish and seafood can be substituted.

I'm able to make this chowder in my large, deep skillet (it gets a bit full)you may want to start out with a good sized pot.

Serves 3 to 4 as a Main dish.

Ingredients
1 qt. Half-n-Half
1/2 + Pound Potatoes - Cubed (I like to use the small red potatoes)
1/3 to 1/2 Onion - Minced
1/2 lb + of salmon cooked and flaked or broken up (be sure to remove all bones)
1 Can Kernel Corn - drained

In your pot, bring well salted water to a boil and add the cubed potatoes, sample the potatoes - when they're about half cooked, add the onions. Then the potatoes are done, drain the potato and onion mixture in a colander and set aside. ddt the Half-n-Half to your pot, add the broken up salmon, and corn. You don't need to bring it to a boil, just make sure the mixture is hot and the salmon and corn is heated through, add your potato and onions into the chowder and serve!

For Taste Sake
I personally like fresh cracked black pepper on my chowder
My "Better Than Garlic Bread" is a great addition (see my earlier recipe)
If you don't have leftover salmon, you can quickly microwave a piece.
If you reheat your leftover salmon first, it's much easier to remove the skin, flake it and remove any bones.


Thursday, March 3, 2011

Salmon Cakes / Salmon Patties

This is one of the recipes I turn to when we've forgotten to thaw something for dinner. They're quick and easy to make, delicious, make a tasty main dish or appetizer and can be served with a variety of sauces to add variety.
I make sure there's always a few cans of salmon in the house, by buying several when they go on sale.

1 Can (aprox 15oz.) Salmon
1 Cup Italian Bread Crumbs
1 egg
3 or 4 heaping tablespoons of Italian (flat leaf) Parsley (use 1/2 that if using dried herbs)
1 Jalapeno Pepper - minced
1 Med Shallot - roughly minced
1 Tbsp Horseradish
1 Tbsp Mustard


Drain the salmon, and place in a bowl - some people remove the bones (if any) They are completely edible - I like to remove them and eat them my self. Flake (break up into small pieces) the salmon, add the remaining ingredients. Fold the ingredients together - mix them together thoroughly but don't stir so completely it's unrecognizable mush - you want to preserve  some of the chunks etc.
Generously coat the bottom of a large skillet with cooking oil and bring to temperature over a medium heat. I wet my finger slightly in the sink and flick it into the oil to see if it crackles - use CAUTION!
Take a heaping tablespoon of mix into your hands and  form a patty - go around the outer edge with your finger pressing the edge inward to try and make the patty as uniformly thick as possible - thin edges will cook quicker than the remainder of the patty and could burn before the patty is thoroughly cooked.
Place the patties in the pan in an orderly manner so that as they brown, you can determine what order they are browning in. Flip them over and brown on the other side. A small offset spatula is VERY handy for turning the patties. Remove to a folded paper towel to drain the oil.

Makes 8 to 12 - 3" patties makes great finger food and reheats well.

Serve with a variety of sauces - Tartar Sauce, Soy Sauce, Teriyaki Sauce, Cocktail Sauce, Ranch Dressing, and flavored mustards etc.

For Taste Sake
Top them with my Hot Crab Dip or Hot Crab & Shrimp Dip
Green onion can be substituted for Shallot
If you don't like the heat of a Jalapeno pepper - cut it open and remove the seeds & veins - then you'll still have the flavor but not the heat - slice into small strips then mince the strips int 1/8 - 1/16" cubes
Experiment with different mustards - rustic seed mustard is my favorite, but an Orange or Lemon mustard is a great addition.


Sunday, September 26, 2010

Marinated Mussels

I came up with this recipe many years ago when I ran across an awesome sale on mussels and wanted to extend the joy! They make a wonderful Appetizer/hors d'oeuvres as well as a decadent snack. They keep in the refrigerator for a few months (IF they last that long!)

1 Batch (basically 1 cup) Herb Salad dressing
2 Pounds Steamed Mussels
2 or more cloves Elephant Garlic

Start with the Herb Salad Dressing, posted earlier.
The mussels are best if fresh, but they are not always in season - they are commonly available frozen and when cooked according to the directions, are very suitable.
If you are using fresh mussels - make sure they are all alive (shell tightly closed - with those that are slightly open - tap another against it's shell, if it doesn't close, throw it away.) Rinse the shells to remove any loose debris and remove the beards - the beards are the fibers that the mussel produces to attach itself to rocks. Take a dull butter knife and pinch the fibers found along the seam of the shell, between the knife and your thumb, and pull the fibers away. If you are using frozen mussels - check for a beard, but most I've come across have the beard already removed. Steam the mussels until they open, Discard those that won't open - they were dead (you don't know for how long or from what - you only want to eat the ones that were healthy). Remove the meat from the shells, use a dull knife to scrape off the muscle that adheres the meat to the shell.

I like to layer thin slices of Elephant Garlic and mussel meat, in the marinade. Sliced shallot, small button mushrooms, sliced or quartered larger mushooms make great additions. I use a quart size canning jar to store the marinated mussels in the refrigerator. An empty mayonnaise  jar or other or similar container will also work. Periodically holding the jar horizontally and "rolling" it in your hands will mix it well. The mussels can be eaten immediately. At that point they are simply coated with the salad dressing, after about a week the marinade will start to penetrate and enhance the flavor.

 A Mandolin Peeler makes short work of slicing the Elephant Garlic.

 For serving - They can be eaten straight from the jar, I like to place a slice of Elephant Garlic on a cracker then a mussel on top. They also make an awesome addition to a Caprese Salad.

Wednesday, June 2, 2010

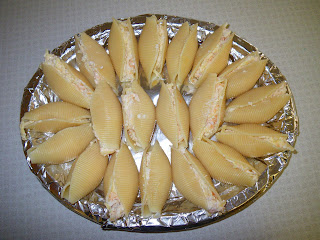
Sea Shells - Jumbo Pasta Shells - stuffed with Shrimp, Crab & Swiss Cheese!

This is one of my favorite hors d' oeuvres to make, and eat!


This appetizer is WONDERFUL on so many levels, first and foremost they are delicious, quick and easy to make, have eye appeal, can be made ahead, and they are served chilled.

I often keep a box of Jumbo Pasta Shells, cans of tiny shrimp and canned crab in my pantry at all times. I usually have at least 2 or 3 of the remaining ingredients: shallots, Swiss cheese, celery and mayonnaise in the refrigerator, so I may only have to go out for one or two of the ingredients before I can whip this appetizer up on short notice.

Makes about 20
 

Ingredients
1 box Jumbo Pasta Shells (16 oz.)
1 can tiny shrimp, drained approx 4.5 oz
1 can crab meat, drained approx 6oz
8oz (1/2 lb) shredded Swiss Cheese
1/2 Cup Mayonnaise
2 tablespoons thinly sliced celery
2 tablespoons chopped shallot

Stuffing Mixture

Place the Shrimp, Crab, Cheese, Mayonnaise, Celery, and Shallot in a bowl, then gently mix the ingredients together, trying not to mash it all together.
Cover the bowl and refrigerate while cooking the shells.

Cooking the Shells

Boil an adequate amount of water - approximately 6quarts, add salt, approx. 1/8 cup.
Add the shells to the boiling water, making sure they all become submerged quickly to ensure even cooking.
Gently stir the shells every so often, making sure they don't stick to the bottom.
To test for doneness: Pull out a shell, with the edge of a spoon or a knife blade snip off a piece of pasta and make certain that it's fully cooked, not “al dente”.

Stuffing the Shells

When the shells are fully cooked, drain them in a colander, and rinse in cold water, to stop the cooking process and to cool them to a comfortable working temperature.
Put the shells back into the pot used for cooking them, and add enough cold water to cover them half way, this keeps them moist while stuffing them.
Choose the best shells – some will have broken in the cooking process and there'll be some excess.
Remove a shell from the pot, and shake off excess water. Hold the shell open with one hand, and scoop about 1 tablespoon of your mixture into the shell. Form the shell into a natural shape and place on the plate.
When you’ve used up all of your stuffing mixture, cover the dish with plastic wrap to prevent them from sliding around and from drying out. Refrigerate until it’s time to serve them.

Tips
One annoying part about bringing a dish to a get together - is after it's over - remembering to retrieve your dish! I've lost some dishes that way! My solution - if it's not a really fancy occasion is to take a sturdy paper plate - the oval ones are my favorite. Cover it in aluminum foil and you have a semi fancy serving dish that's disposable. Placing another inverted dish on top, makes them ready to travel.

Put the leftover pasta in a baggie, later on, put pasta sauce over them and microwave, for a quick meal.

Sunday, April 18, 2010

Clam Fritters


Background
In my younger days I’d study the Tide’s Tables, when there was a low tide in the winter during daylight AND on one of my day’s off – I’d head to Tamale’s Bay near the Point Rey’s National Park to an area called Lawson’s Landing. I’d arrive early, sometimes with my crab nets to throw off the pier and fishing rods to catch whatever would bite. At the proper time my friend & I (or at times by myself) would hop in my kayak and as the tide went out – head to the emerging island(s) out in the bay, beach the kayak and dig for the famous “Horse-neck clams’ they were huge! Each clam weighed about 3 pounds and had a “neck” on it that could stretch about 3 feet – which meant the clam was 3 feet deep in the sand and mud. If you’ve ever dug a hole in the sand at the beach you know that you’d only get so deep before the hole collapsed in on itself. I had a 3’ x 16” piece of PVC pipe that I’d shove into the sand. Shovel sand out of it, push it down, and shovel some more – by time it was completely buried – I’d found my clam! The limit was 10, so on to the next one! By time the tide came back in I had 30 pounds of clams! LOTS of material to make all kinds of epicurean delights with – mostly a killer clam chowder and clam fritters! That was many years ago!
Recently my wife came home with a package of Razor Clams – thinking “They look cool, and Fred can probably make something yummy with them’. Well they stayed in the freezer for a little while, then came the time to cook them, my mind sifted thought the possibilities and I settled on an old recipe of mine – Clam Fritters – would these new clams prove suitable? – the verdict YES!

Recipe
Clam Fritters

I’ve only made these with Horse Neck clams and now Razor Clams (I can’t guarantee results with other species of clams)
I grind up the clam meat with a meat grinder attachment for my Kitchenaid, if you’re using a food processor – “pulse” it until you get a “rough chop” or if you don’t have a grinder or food processor, you can “mice” the clam meat to about 1/8” bits.
You’re looking for a 1:1 ratio of Clam meat to Cracker Crumbs
1 cup minced clam meat
1 cup cracker crumbs (crush them by hand in a bag – rough crush not “dust’)
1 egg
1 TBSP minced fresh Flat-leaf /Italian parsley (if you have to use dried ½ TSPB)
1 TBSP minced fresh ginger
1 TBSP minced fresh garlic
1 pinch salt (I like to use a “big grain’ salt like “Kosher” salt
1 pinch black pepper
Mix together to get a sticky mix – if it’s too lose add more cracker crumbs

Over a medium heat in a frying pan add enough vegetable oil to coat the bottom of the pan. When the oil is hot, form a golf ball size portion of the mixture – roll it into a ball then flatten it into about ½’ patty – drop into the oil and brown on both sides. Remove to a paper towel lined dish to drain. They are wonderful all alone but for variety, serve with dipping sauces of, Cocktail Sauce, Tartar Sauce, Sweet Chili Sauce, Teriyaki Sauce or a 1:1 mix of Mayo and flavored mustard (Wasabi, Dijon, Orange, Raspberry)
You can easily make these the day before and microwave or reheat in the oven, they freeze well up to a month.
Bon appetite!


-----------------------------
If you found the contents of this BLOG useful - any donation amount, will help contribute to the further development of this site - ALL donors will be redirected to a Thank You page where you can download a Free Electronic book "The Ultimate Chicken Wing Cook Book"


Friday, November 20, 2009

Asian Salmon Lettuce Wraps

These make a great appetizer/hors d'oeuvres or even a lite main dish.

Asian Salmon Lettuce Wraps:
Ingredients
Butter Lettuce (1 or 2 heads)- you can expect to get 4-6 good sized leaves off each head to make each wrap.
1 Good Sized Carrot
1 Head Cabbage
Sesame Oil
Salad Oil/ Vegetable Oil
Sesame Seeds
Soy Sauce
Sweet Chili Sauce
Cucumber
Salt
Pepper
Butter
Olive Oil
Rice Wine Vinegar
Sugar
1 Med/Large Shallot
1 Piece of Salmon Fillet about 4-6" wide

Butter Lettuce Head
Finely sliced cabbage (cut the main vein out of the leafs and thinly slice it separately, stack the leaves, roll them tightly then thinly slice them)
Shredded carrot (for shredding - a julienne peeler makes short work of this task)
About a 4 to 1 ratio of Cabbage to carrot is good (1 cup cabbage 1/4 cup carrot)
If you like cuccumber - cut a chunk in 1/2 lengthwise, scoop out the seeds then cut the halves again into quarters and thinly slice them.

Asian Dressing
1/8 Cup Sesame Oil
1/8 Cup Salad Oil
2 tbsp sugar
3 tbsp rice wine vinegar
1/2 tsp salt
1/8 tsp black pepper

Thinly slice the salmon meat  Slicing it crosswise (knife running from tail to head instead of back to belly) holds it together a bit better. Slicing with the knife running back to belly is most common. Slice straight towards the skin then once the knife makes contact with the skin twist your wrist and slice the meat off the skin instead of all the way through the skin.

Make your salad by mixing Cabbage, Carrot, Cucumber, & dressing together in a bowl.

Preheat a shallow frying pan with 1/2 olive oil & 1/2 butter mixture - just enough to coat the bottom of the pan.
Dredge the pieces of salmon in seasoned flower (salt, pepper, garlic powder, smoked paprika) and brown both sides. Place salmon pieces on a paper towel covered plate to drain. Add 1/2 Butter 1/2 Olive Oil mixture as needed.
When all of the salmon has been cooked and removed, Put 1/4 cup minced shallot in the pan, when the shallot turns translucent, add 1/4 cup of soy sauce and 1/4 cup Sweet Chili Sauce, when it begins to boil, turn the heat off and place in a bowl or gravy boat.

Assemble your wraps by placing a leaf of Butter Lettuce down on a plate, scoop some salad on top, then slices of salmon, topping it off with the sauce and a sprinkle of sesame seeds, fold and eat!


-------------------------------------

If you found the contents of this BLOG useful - any donation amount, will help contribute to the further development of this site - ALL donors will be redirected to a Thank You page where you can download a Free Electronic book "The Ultimate Chicken Wing Cook Book"