Showing posts with label hors d' oeuvre. Show all posts

Sunday, January 11, 2015

Teriyaki and Garlic Glazed Edamame

Teriyaki and Garlic Glazed Edamame!

Teriyaki and Garlic Glazed Edamame makes a great appetizer or finger food side dish.

This quick and easy recipe will have you and your guests licking their fingers, wanting more. 

Edamame are immature soybeans in the pod. Commonly found in Asian dishes. I've been in several
Teriyaki garlic glazed Edamame
Japanese Restaurants that serve a bowl of steamed edamame to munch on when you are seated. They're a healthy snack, and I commonly turn to them when I'm making finger food for dinner. It's much easier to put down your chicken leg and pick up an edamame pod, extract the beans, and go back to your chicken leg. My favorite recipe for them is with a Teriyaki and Garlic glaze. Edamame in the shell are often found in the frozen vegetable section of grocery stores. One pound should serve four people as a side dish or more people as an appetizer. The can be server warm or cold.

1 Pound Edamame in the shell
1/4 to 1/2 cup of  broth (Vegetable, Chicken, or Beef) or water
2-3 cloves of garlic minced
1/4 to 1/2 cup Teriyaki Sauce

In a large sauce pan over medium heat, put the edamame in the pan with the broth or water - this
Teriyaki garlic glazed Edamame in the pan
liquid is to simply help thaw the edamame, after a few minutes when it looks like the edamame is starting to thaw, add the Teriyaki sauce and garlic. Stir occasionally to cote the pods, when the broth or water has evaporated and the Teriyaki sauce starts to thicken and become sticky. They're done! Each Teriyaki sauce is different - besure you buy Teriyaki 'Sauce' and not marinade which is much thinner. As the liquid starts to evaporate, start turning down the heat so you can gauge the thickness of the sauce and prevent burning.
Serve hot or at room temperature. An Asian style bowl or small dish adds to the theme. They're eaten by grasping the pointy end of the pod, placing the entire pod in your mouth and pulling the pod back out of your mouth while gently clamping down on the pod enough to cause the pod to split and the beans to remain in your mouth.
Finger Food Dinner: Teriyaki garlic glazed Edamame, breaded pork medalions, grilled trout, crab quesadilla.
An empty bowl for discarding the pods is a handy addition.


Thursday, December 11, 2014

Potluck Crockpot BBQ Meatballs

Potluck Crockpot BBQ Meatballs

This isn't a recipe per se, it's a survival tip!

This is my go to dish for the potluck at work.

Tis the season! It's the season of shopping, family, parties and lots of extra activities. It's also the
season of potlucks! Now if you're running short on time, here's a slam dunk way to participate in a potluck without spending too much time preparing a dish.
  I've got a 6qt oval crockpot, pretty much any one will do. Buy some pre-cooked frozen meatballs - for the latest one I grabbed two 2# bags of frozen meatballs. Each bag had approximately 64 1/2 oz bite size meatballs, flame broiled - I believe that adds some flavor and an 18 oz bottle of BBQ sauce. The beauty of this is that I can grab my crockpot, the bag(s) of frozen meatballs, and BBQ sauce all fit inside the crockpot along with a serving spoon. Don't forget the serving spoon!


 When I get to work, I layer the meatballs and BBQ sauce in the crockpot. I'll put an ounce or so of hot water in the BBQ sauce bottle and rinse it out into the crockpot, giving me some extra moisture for thawing and cooking. I turn the crockpot on low. I stir them every 45 to 60 min - when lunch time rolls around, the meatballs are heated through and are ready to go! And the nice part is that they usually get completely eaten and I don't have to deal with transporting leftovers! 


Thursday, January 30, 2014

Emulsified Green Chili Salsa


Green Chili Salsa
Salsa Verde - An Emulsified Green Chili Salsa
This recipe came from my attempts to make a Salsa Verde that I found at Dos Coyotes Border Cafe their Green Chili Salsa is one of my favorites. While I still don't think I 'Nailed it' I do believe I've made some batches that were better! This recipe will give you a fresh, light, exotic green salsa with a hint of heat.  As with most of my recipes, I strive to give you the basic building blocks of the recipe, so that you can make it your own my changing it. This recipe will give you a fresh tasting, rather exotic salsa with just a hint of heat.

Green Chili Salsa

Salsa Verde Ingredients:

2 Poblano or Pasilla Peppers - these are large fat mild Chili Peppers
2 Jalapeno Peppers - these are  small smooth skinned hotter Chili Peppers
1/2 Large onion
1/2 cup Canola or other vegetable Oil
1 Bunch Cilantro leaves stripped from the stems

A Chili by any other name? There's lots of confusion concerning the names of Chilis: Poblano, Ancho, Pasilla. Here's a picture of the ones I use http://www.worldcrops.org/images/content/Poblano_peppers_in_S._Deerfield_-_550.JPG

Roast the Peppers and onion, I like to separate the layers of the onion
Green Chili Salsa
Once the pepper's skins have been scorched - place them in a closed plastic container to steam and cool down. Once the peppers are cool enough to handle, remove the tops, skin and seeds.

Place the oil in the blender and either add each ingredient separately between bursts of blending, or turn on the blender and add the Onion, Peppers (I cut them into strips), and cilantro.

Serve it with traditional Tortilla Chips, Crackers, as a vegetable dip, and as a topping for your favorite Mexican dish.

For Taste Sake

Green Chili Salsa
It's the emulsification of the oil and the moisture in the peppers and onions that gives the salsa it's unique color

The oil does add to the flavor, so experiment with different oils.

Add Salt and pepper to taste

When adding salt to this recipe, remember to take into account the amount of salt that may already be present on the chips that you're serving it with - be sure to taste it with a chip and not just with your finger

Roasting the onion releases the gas that gives onions their 'bite', so if you like the bite of raw onion, don't roast the onion.

Roasted tomatillos add great flavor - cut them in half or quarters and roast them with the Chili Peppers and onion - you'll have to add extra jalapenos to keep the tomatillos from diluting the heat.

You can also throw a raw garlic clove or two in the blender with the other ingredients to step up the flavor.

Serve it with traditional Tortilla Chips, Crackers, as a vegetable dip, and as a topping for your favorite Mexican dish.

If you have a really good blender, you don't have to strip the cilantro leaves from the stems - the blender will pulverize the stems.

The Chili Peppers can be roasted on a BBQ grill, on a gas stove burner, gas or electric oven broiler, turn them often until the skin has been scorched and blistered


Wednesday, September 19, 2012

Fred's Famous Fresh Salsa

The key to this recipe is the fresh ingredients - you can vary the recipe to your own liking. Experiment and make it your own.


Ingredients

10 Chili Peppers (Anaheim, Sweet Italian, Banana,  Pasilla) - Roasted & peeled
1 Medium Onion - minced
4 Medium to Large Meaty Tomatoes (Beefsteak, Plum, Shady Lady, Better Boy) - diced
1 Bunch Cilantro - chopped
Coarse Salt, Cracked Pepper, Minced Garlic or Garlic Powder to taste

The peppers are the most time consuming aspect of this recipe - they can be prepared ahead of time and refrigerated.
The chili peppers have a very thin, very tough skin on them that should be removed. Some sort of flame makes it easy - BBQ, Gas Broiler, Gas Stove, Blow torch. The chilis can be roasted in an oven but it's not as effective. Place the chilis over direct flame and rotate them until the skin becomes charred and blistered as much as possible. Remove the peppers from the flame into a plastic or paper bag, close the bag and let them sweat, steam until they're cool enough to handle. The skin should now be easy to remove by hand.
With a sharp pairing knife, cut off the top of the pepper, slice it open from the opening to the tip and lay it open. Scrape out the seeds. If you are storing the peppers for later use, simply storing them in a bowl will result in a bowl of slimy peppers. I place a saucer upside down in the center of a medium or large plate. Stack the peppers on top of the saucer and wrap in saran, and store in the refrigerator. The slime will drain it's way to the under plate, away from the peppers.

I like this style of salsa rather dry and chunky. So I dice the Tomatoes, Onions, and peppers on the bigger side. Chop the Cilantro well, you can pull the leaves off and chop them, but you can also getaway with bundling it up tightly and cutting 1/8" slices off the bundle. Avoid chunks of stems in your salsa.

When dicing the tomatoes, I put the cutting board on a slant and let the juice run into the sink. I only use the meat of the tomato, discarding the seeds and juicy portion surrounding them.

So mix all the ingredients together, add salt, pepper (preferably fresh cracked), minced garlic or garlic granules or powder to taste. The salt will draw even more moisture from the produce - I like to drain the salsa when juice starts to accumulate. You don't have to throw the juice away - it's great in Bloody Mary's - I hear it cures hangovers
Serve with tortilla chips, over dishes like grilled Salmon etc.

For Taste Sake
Fresh minced garlic might be too much for some people - the Minced Garlic in a jar is less potent.
Experiment with different types of onions, Yellow, White, Brown, Red, Sweet Walla Walla, Maui, Torpedo) Torpedos are my favorite they can be spicy.
A great addition to this salsa is corn - either freshly cut from the cob or roasted first.
Fire roasted Tomatoes (like you did with the peppers) makes a great variation.

This salsa is at it's very best when made fresh but tomatoes and chili peppers aren't always available - you can experiment with canned chopped tomatoes (some are available with Italian or Mexican spices) and canned chopped chili peppers.


Friday, August 3, 2012

Sweet Bell Peppers with Mushroom and Onion Appetizer

Marinated Sweet Bell Peppers with Mushroom and Onion Appetizer Antipasto

Nothing says Summer like a Dish of Colorful Fresh Vegetables!
This easy to make, make ahead dish really brings out sweetness of the Bell Peppers.
This is a very flexible dish to make so don't get too caught up in the number of peppers vs onions and Mushrooms - I've even made it with only Mushrooms and Onions.

One or two each of each color Bell Pepper (Green, Yellow, Orange, Red etc.)
One Medium to Large Onion per 4 Peppers
6 to 12 small to medium Mushrooms per 4 Peppers
Good Extra Virgin Olive Oil
Balsamic Vinegar
Some Fresh Italian Herbs, or Dried Italian Herb mix

Wash the peppers, and with a sharp paring knife inserted into the top outer edge of the pepper, cut all the way around the outer edge, as if you're removing a Pumpkin top for cleaning. Grasping the stem, pull the core of the pepper out, removing a great deal of the membrane and seeds with it. Discard the core. Tapping the sides of an inverted pepper will remove most of the seeds, try to remove as many as you can, they are edible so you don't have to be 100% accurate.
Using a larger Chef's Knife, cut the peppers vertically into strips.

Remove the outer paper like skin of the onion, remove the top and bottom of the onion and discard the top, bottom and outer skin. Cut the onion vertically into fourths peel the center sections of the quarters away from the outer section about half way between, take the remaining outer sections and cut them in half vertically, making them the approximate size of the middle pieces. So ot slices are too big or too small.

Mushrooms are like sponges so we typically try to clean them without washing them - a goodt Mushroom Brush will accomplish this - brush off any loose material. Set the mushroom upside down on the cutting board and slice them into quarters.

These freshly cut vegetables could easily be served up with dip in this condition, not many people appreciate a raw onion, so we're going to add an additional depth of flavor.

We're going to sweat the Peppers and Onions. This can be done in an oven or in a pan on the top of the stove. Sweating the vegetables is simply applying heat until the plant's cell walls begin to break down and the slices become limp and the onion becomes translucent. Start by coating the vegetables with the olive oil. This can be done in any manner you like but I've found, tossing them in a stainless steel bowl to be the quickest and most efficient and probably the cleanest. Fill the Stainless Steel bowl no more than half way with vegetables, drizzle some oil on them and either stir them with a spatula, or grasp the bowl in one hand and flip them over and over like you've seen your favorite chef flip a pancake or a saute pan of vegetables. You can practice over the sink. You can add the Italian Spices at this time or during the cooking process. Now either lay them out on a foil lined cookie sheet, or into a skillet that has a top to it. A low to medium heat is best, 300-350 oven temperature. Peppers and onions will cook at different time and temperatures so I typically cook them separately using the skillet, or on separate cookie sheets, then you can pull them off the heat when they're done. Stirr them every so often to make sure they're all getting heated at the same time.
The mushrooms don't get cooked, they can be put in the stainless steel bowl with Oil, Balsamic Vinegar, spices and toss.

When the vegetables are limp, if you haven't already added the spices - do it now. Splash on the Balsamic Vinegar to taste. If you're going to serve the dish now - stir in the mushrooms and serve. If you're making the dish ahead of time, allow the vegetables to cool, add the mushrooms, and put into a container (a gallon sized ziplock bag works great).

This dish can last up to a week in the refrigerator, flip or shake the container daily to coat the contents and distribute the marinade.

For Taste Sake

The leftovers or the prepared dish can be reheated alone or added to a stir fry.

These are wonderful, served along side other appetizers, antipasto like sliced or cubed salami, cheeses, marinated artichoke hearts, anchovies, pickled peppers, and olives.
For Christmas time, consider using only Red and Green Peppers.


Thursday, March 3, 2011

Salmon Cakes / Salmon Patties

This is one of the recipes I turn to when we've forgotten to thaw something for dinner. They're quick and easy to make, delicious, make a tasty main dish or appetizer and can be served with a variety of sauces to add variety.
I make sure there's always a few cans of salmon in the house, by buying several when they go on sale.

1 Can (aprox 15oz.) Salmon
1 Cup Italian Bread Crumbs
1 egg
3 or 4 heaping tablespoons of Italian (flat leaf) Parsley (use 1/2 that if using dried herbs)
1 Jalapeno Pepper - minced
1 Med Shallot - roughly minced
1 Tbsp Horseradish
1 Tbsp Mustard


Drain the salmon, and place in a bowl - some people remove the bones (if any) They are completely edible - I like to remove them and eat them my self. Flake (break up into small pieces) the salmon, add the remaining ingredients. Fold the ingredients together - mix them together thoroughly but don't stir so completely it's unrecognizable mush - you want to preserve  some of the chunks etc.
Generously coat the bottom of a large skillet with cooking oil and bring to temperature over a medium heat. I wet my finger slightly in the sink and flick it into the oil to see if it crackles - use CAUTION!
Take a heaping tablespoon of mix into your hands and  form a patty - go around the outer edge with your finger pressing the edge inward to try and make the patty as uniformly thick as possible - thin edges will cook quicker than the remainder of the patty and could burn before the patty is thoroughly cooked.
Place the patties in the pan in an orderly manner so that as they brown, you can determine what order they are browning in. Flip them over and brown on the other side. A small offset spatula is VERY handy for turning the patties. Remove to a folded paper towel to drain the oil.

Makes 8 to 12 - 3" patties makes great finger food and reheats well.

Serve with a variety of sauces - Tartar Sauce, Soy Sauce, Teriyaki Sauce, Cocktail Sauce, Ranch Dressing, and flavored mustards etc.

For Taste Sake
Top them with my Hot Crab Dip or Hot Crab & Shrimp Dip
Green onion can be substituted for Shallot
If you don't like the heat of a Jalapeno pepper - cut it open and remove the seeds & veins - then you'll still have the flavor but not the heat - slice into small strips then mince the strips int 1/8 - 1/16" cubes
Experiment with different mustards - rustic seed mustard is my favorite, but an Orange or Lemon mustard is a great addition.


Monday, January 31, 2011

Grumpypasto - Antipasto

Tired of the same old dips and appetizers? Try this hearty antipasto.
Grumpypasto with anchovy wrapped capers
This antipasto got it's name from my brother in-law's father, who was known by friends and family by the nickname 'Grumpy'. He was known for his cooking skill - this is his recipe, which is a family favorite. We lost Grumpy in 2008 but his memory lives on. I've kept the original recipe intact, just rearranged the list of ingredients to reflect the order of use - I've added my notes at the end. Enjoy!

1/8 Cup Extra Virgin Olive Oil
1 Carrot, peeled and sliced about 1/8 inch
1/2 medium onion, rough chopped
2 Celery Stalks, chopped
1/4 head Cauliflower Broken into small pieces
5 raw mushrooms, sliced into 4 pieces
1 small garlic clove, crushed and minced
6oz Chili Sauce (Del Monte/ Huntz)
1 tsp. salt
1tsp. Accent
1 (6oz) can solid pack white albacore tuna
3 oz marinated artichoke hearts and juice
Juice of 1/2 fresh lemon
12 Black olives, sliced in half
10 Green Olives, sliced in half (Spanish Style)
Capers and/or anchovies (few, optional)
7 oz ketchup


Put oil in 3 quart microwavable pot, add sliced carrots, stir; cover and cook on HIGH heat for 3 minutes.
Add chopped onions and celery, stir; cover and cook on HIGH heat for 2 minutes.
Add cauliflower, stir; cover and cook on HIGH heat for 2 minutes.
Add mushrooms, stir; cover and cook on HIGH heat for 2 minutes. Set aside.

In a large glass or stainless steel bowl, add ketchup, chili sauce, lemon juice, salt, Accent, and garlic, and mix well.
Add cooked vegetables, Mix; add well drained tuna, broken into pieces, olives, artichoke hearts (with juice), cocktail onions, and carefully mix again.
Can be eaten immediately but reaches full flavor after being refrigerated 1 to 2 days or more.

For Taste Sale
Being a Mediterranean dish - consider adding 2 or 3 tablespoons of fresh chopped Flat Leaf (Italian) Parsley.
Another Mediterranean addition - Feta cheese.
He mentions adding anchovies and/or capers - I found canned, anchovy wrapped capers. They are WONDERFUL - I place them on top of the mix after I've put it in the serving bowl.
A sign of our times - he calls for a 6oz can of solid Albacore tuna - all I could find in the store these days are 5oz cans - it's up to you weather to go with 5oz or buy a second can and use 1/5 of it in the recipe.
I don't add the Accent
Serve with a sturdy cracker, sliced toasted chunks of bread.


Sunday, September 26, 2010

Marinated Mussels

I came up with this recipe many years ago when I ran across an awesome sale on mussels and wanted to extend the joy! They make a wonderful Appetizer/hors d'oeuvres as well as a decadent snack. They keep in the refrigerator for a few months (IF they last that long!)

1 Batch (basically 1 cup) Herb Salad dressing
2 Pounds Steamed Mussels
2 or more cloves Elephant Garlic

Start with the Herb Salad Dressing, posted earlier.
The mussels are best if fresh, but they are not always in season - they are commonly available frozen and when cooked according to the directions, are very suitable.
If you are using fresh mussels - make sure they are all alive (shell tightly closed - with those that are slightly open - tap another against it's shell, if it doesn't close, throw it away.) Rinse the shells to remove any loose debris and remove the beards - the beards are the fibers that the mussel produces to attach itself to rocks. Take a dull butter knife and pinch the fibers found along the seam of the shell, between the knife and your thumb, and pull the fibers away. If you are using frozen mussels - check for a beard, but most I've come across have the beard already removed. Steam the mussels until they open, Discard those that won't open - they were dead (you don't know for how long or from what - you only want to eat the ones that were healthy). Remove the meat from the shells, use a dull knife to scrape off the muscle that adheres the meat to the shell.

I like to layer thin slices of Elephant Garlic and mussel meat, in the marinade. Sliced shallot, small button mushrooms, sliced or quartered larger mushooms make great additions. I use a quart size canning jar to store the marinated mussels in the refrigerator. An empty mayonnaise  jar or other or similar container will also work. Periodically holding the jar horizontally and "rolling" it in your hands will mix it well. The mussels can be eaten immediately. At that point they are simply coated with the salad dressing, after about a week the marinade will start to penetrate and enhance the flavor.

 A Mandolin Peeler makes short work of slicing the Elephant Garlic.

 For serving - They can be eaten straight from the jar, I like to place a slice of Elephant Garlic on a cracker then a mussel on top. They also make an awesome addition to a Caprese Salad.

Wednesday, June 2, 2010

Sea Shells - Jumbo Pasta Shells - stuffed with Shrimp, Crab & Swiss Cheese!

This is one of my favorite hors d' oeuvres to make, and eat!


This appetizer is WONDERFUL on so many levels, first and foremost they are delicious, quick and easy to make, have eye appeal, can be made ahead, and they are served chilled.

I often keep a box of Jumbo Pasta Shells, cans of tiny shrimp and canned crab in my pantry at all times. I usually have at least 2 or 3 of the remaining ingredients: shallots, Swiss cheese, celery and mayonnaise in the refrigerator, so I may only have to go out for one or two of the ingredients before I can whip this appetizer up on short notice.

Makes about 20
 

Ingredients
1 box Jumbo Pasta Shells (16 oz.)
1 can tiny shrimp, drained approx 4.5 oz
1 can crab meat, drained approx 6oz
8oz (1/2 lb) shredded Swiss Cheese
1/2 Cup Mayonnaise
2 tablespoons thinly sliced celery
2 tablespoons chopped shallot

Stuffing Mixture

Place the Shrimp, Crab, Cheese, Mayonnaise, Celery, and Shallot in a bowl, then gently mix the ingredients together, trying not to mash it all together.
Cover the bowl and refrigerate while cooking the shells.

Cooking the Shells

Boil an adequate amount of water - approximately 6quarts, add salt, approx. 1/8 cup.
Add the shells to the boiling water, making sure they all become submerged quickly to ensure even cooking.
Gently stir the shells every so often, making sure they don't stick to the bottom.
To test for doneness: Pull out a shell, with the edge of a spoon or a knife blade snip off a piece of pasta and make certain that it's fully cooked, not “al dente”.

Stuffing the Shells

When the shells are fully cooked, drain them in a colander, and rinse in cold water, to stop the cooking process and to cool them to a comfortable working temperature.
Put the shells back into the pot used for cooking them, and add enough cold water to cover them half way, this keeps them moist while stuffing them.
Choose the best shells – some will have broken in the cooking process and there'll be some excess.
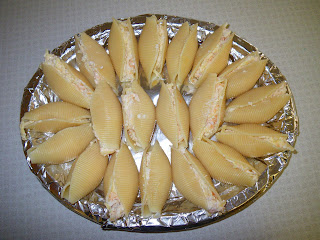
Remove a shell from the pot, and shake off excess water. Hold the shell open with one hand, and scoop about 1 tablespoon of your mixture into the shell. Form the shell into a natural shape and place on the plate.
When you’ve used up all of your stuffing mixture, cover the dish with plastic wrap to prevent them from sliding around and from drying out. Refrigerate until it’s time to serve them.

Tips
One annoying part about bringing a dish to a get together - is after it's over - remembering to retrieve your dish! I've lost some dishes that way! My solution - if it's not a really fancy occasion is to take a sturdy paper plate - the oval ones are my favorite. Cover it in aluminum foil and you have a semi fancy serving dish that's disposable. Placing another inverted dish on top, makes them ready to travel.

Put the leftover pasta in a baggie, later on, put pasta sauce over them and microwave, for a quick meal.

Sunday, April 18, 2010

Clam Fritters


Background
In my younger days I’d study the Tide’s Tables, when there was a low tide in the winter during daylight AND on one of my day’s off – I’d head to Tamale’s Bay near the Point Rey’s National Park to an area called Lawson’s Landing. I’d arrive early, sometimes with my crab nets to throw off the pier and fishing rods to catch whatever would bite. At the proper time my friend & I (or at times by myself) would hop in my kayak and as the tide went out – head to the emerging island(s) out in the bay, beach the kayak and dig for the famous “Horse-neck clams’ they were huge! Each clam weighed about 3 pounds and had a “neck” on it that could stretch about 3 feet – which meant the clam was 3 feet deep in the sand and mud. If you’ve ever dug a hole in the sand at the beach you know that you’d only get so deep before the hole collapsed in on itself. I had a 3’ x 16” piece of PVC pipe that I’d shove into the sand. Shovel sand out of it, push it down, and shovel some more – by time it was completely buried – I’d found my clam! The limit was 10, so on to the next one! By time the tide came back in I had 30 pounds of clams! LOTS of material to make all kinds of epicurean delights with – mostly a killer clam chowder and clam fritters! That was many years ago!
Recently my wife came home with a package of Razor Clams – thinking “They look cool, and Fred can probably make something yummy with them’. Well they stayed in the freezer for a little while, then came the time to cook them, my mind sifted thought the possibilities and I settled on an old recipe of mine – Clam Fritters – would these new clams prove suitable? – the verdict YES!

Recipe
Clam Fritters

I’ve only made these with Horse Neck clams and now Razor Clams (I can’t guarantee results with other species of clams)
I grind up the clam meat with a meat grinder attachment for my Kitchenaid, if you’re using a food processor – “pulse” it until you get a “rough chop” or if you don’t have a grinder or food processor, you can “mice” the clam meat to about 1/8” bits.
You’re looking for a 1:1 ratio of Clam meat to Cracker Crumbs
1 cup minced clam meat
1 cup cracker crumbs (crush them by hand in a bag – rough crush not “dust’)
1 egg
1 TBSP minced fresh Flat-leaf /Italian parsley (if you have to use dried ½ TSPB)
1 TBSP minced fresh ginger
1 TBSP minced fresh garlic
1 pinch salt (I like to use a “big grain’ salt like “Kosher” salt
1 pinch black pepper
Mix together to get a sticky mix – if it’s too lose add more cracker crumbs

Over a medium heat in a frying pan add enough vegetable oil to coat the bottom of the pan. When the oil is hot, form a golf ball size portion of the mixture – roll it into a ball then flatten it into about ½’ patty – drop into the oil and brown on both sides. Remove to a paper towel lined dish to drain. They are wonderful all alone but for variety, serve with dipping sauces of, Cocktail Sauce, Tartar Sauce, Sweet Chili Sauce, Teriyaki Sauce or a 1:1 mix of Mayo and flavored mustard (Wasabi, Dijon, Orange, Raspberry)
You can easily make these the day before and microwave or reheat in the oven, they freeze well up to a month.
Bon appetite!


-----------------------------
If you found the contents of this BLOG useful - any donation amount, will help contribute to the further development of this site - ALL donors will be redirected to a Thank You page where you can download a Free Electronic book "The Ultimate Chicken Wing Cook Book"


Friday, November 20, 2009

Asian Salmon Lettuce Wraps

These make a great appetizer/hors d'oeuvres or even a lite main dish.

Asian Salmon Lettuce Wraps:
Ingredients
Butter Lettuce (1 or 2 heads)- you can expect to get 4-6 good sized leaves off each head to make each wrap.
1 Good Sized Carrot
1 Head Cabbage
Sesame Oil
Salad Oil/ Vegetable Oil
Sesame Seeds
Soy Sauce
Sweet Chili Sauce
Cucumber
Salt
Pepper
Butter
Olive Oil
Rice Wine Vinegar
Sugar
1 Med/Large Shallot
1 Piece of Salmon Fillet about 4-6" wide

Butter Lettuce Head
Finely sliced cabbage (cut the main vein out of the leafs and thinly slice it separately, stack the leaves, roll them tightly then thinly slice them)
Shredded carrot (for shredding - a julienne peeler makes short work of this task)
About a 4 to 1 ratio of Cabbage to carrot is good (1 cup cabbage 1/4 cup carrot)
If you like cuccumber - cut a chunk in 1/2 lengthwise, scoop out the seeds then cut the halves again into quarters and thinly slice them.

Asian Dressing
1/8 Cup Sesame Oil
1/8 Cup Salad Oil
2 tbsp sugar
3 tbsp rice wine vinegar
1/2 tsp salt
1/8 tsp black pepper

Thinly slice the salmon meat  Slicing it crosswise (knife running from tail to head instead of back to belly) holds it together a bit better. Slicing with the knife running back to belly is most common. Slice straight towards the skin then once the knife makes contact with the skin twist your wrist and slice the meat off the skin instead of all the way through the skin.

Make your salad by mixing Cabbage, Carrot, Cucumber, & dressing together in a bowl.

Preheat a shallow frying pan with 1/2 olive oil & 1/2 butter mixture - just enough to coat the bottom of the pan.
Dredge the pieces of salmon in seasoned flower (salt, pepper, garlic powder, smoked paprika) and brown both sides. Place salmon pieces on a paper towel covered plate to drain. Add 1/2 Butter 1/2 Olive Oil mixture as needed.
When all of the salmon has been cooked and removed, Put 1/4 cup minced shallot in the pan, when the shallot turns translucent, add 1/4 cup of soy sauce and 1/4 cup Sweet Chili Sauce, when it begins to boil, turn the heat off and place in a bowl or gravy boat.

Assemble your wraps by placing a leaf of Butter Lettuce down on a plate, scoop some salad on top, then slices of salmon, topping it off with the sauce and a sprinkle of sesame seeds, fold and eat!


-------------------------------------

If you found the contents of this BLOG useful - any donation amount, will help contribute to the further development of this site - ALL donors will be redirected to a Thank You page where you can download a Free Electronic book "The Ultimate Chicken Wing Cook Book"