Tuesday, December 28, 2010

Baileys Chocolate Chip Cheesecake

I'm not really a dessert person, but this cheesecake is sooo good it's my favorite dessert! It's my go-to dessert when I want to go all-out. It's rich, not too sweet, has the texture of a creamy cheesecake and the flavor of Baileys Irish Cream, chocolate chips and a graham cracker crust.
I'm not sure where I got this from, otherwise I'd give credit where it's due. This can be made ahead of time and keeps well in the refrigerator. This is much taller than your standard pie-sized cheesecake so it can serve a good sized party.

Crust:
2 Cups graham cracker crumbs (Each packaged 'Brick' of crackers is a bit over 1 cup each)
1/4 Cup Sugar
6 Tbsp. (3/4 stick) butter, melted

Filling:
2 1/4 lbs (4 1/2 - 8oz bricks) Cream Cheese, room temperature or microwave until soft
1 2/3 cups sugar
5 eggs, room temperature
1 cup Baileys Irish Cream
1 Tbsp. vanilla extract
1 cup semisweet chocolate chips

Cooking Instructions:
For Crust:
Preheat oven to 325F.
Coat 9" diameter springform pan with nonstick vegetable oil spray.
Combine graham cracker crumbs and sugar in pan.
Stir in butter.
Press mixture into bottom and 1" up sides of pan.
Bake until light brown, about 7 to 10 minutes.
Maintain oven temperature at 325F.

For filling:
Use electric mixer to beat cream cheese until smooth.
Gradually mix in sugar.
Beat eggs in one at a time.
Blend in Baileys and vanilla.
Scrape down edges of bowl and mixing blades, and remix to ensure consistent texture and flavor.

Sprinkle half of chocolate chips over crust.
Spoon in filling, taking care to not disturb placement of chocolate chips.
Sprinkle the remaining chocolate chips over the top of filling.
Bake cake until puffed, springy in center and golden brown, about 1hour 20 minutes.
Cool cake completely.


For Taste Sake:
Pay attention when assembling the springform pan - you want the 'lip' to face down so that you can slide the finished cake off of the disk, I actually assemble it with a piece of parchment paper in place, when it's cooled I can pull the paper and cake onto my cake stand, then slip an icing knife between the crust and paper, use the icing knife to hold the cake in place while I pull the parchment out from under the cake leaving just the cake on the cake stand.

Cake my crack when puffy, crack(s) will close as cake cools and shrinks. Some cooks prefer to place pan of boiling water in oven with the cake to keep humidity up lessening crack or wrapping the cake pan in aluminum foil, ensuring the bottom and sides are water tight, placing the cake pan, aluminum foil assembly in another larger pan,adding boiling water to the outer pan, then cooking. 

The bottom of a small cup or measuring cup can be used to press the crumb mixture in place and up the sides of the pan.

To top the cake:
Chocolate chips can be placed symmetrically on top of the filling before cooking, giving a nice presentation.


Coffee Cream Topping
1 cup chilled whipping cream, 2 Tbsp. Sugar, 1 tsp. instant coffee powder.Beat cream, sugar, and coffee powder until peaks form. Spread over cooled cake, garnish with chocolate curls.

Amaretto Topping
Dissolve 1 pkt. Knox Gelatin in 1/2 cup Amaretto and bring to a boil as it starts to cool it can be spread over top of cake while it's still in the springform pan it will cool to an translucent amber gel.

Monday, December 13, 2010

Homemade Raviolis

One of the best things about Homemade Raviolis is that you have complete control over how they’re made. There are three components to consider when making raviolis; filling, dough, and sauce.

The filling is limited only by your imagination. Meat, seafood, vegetables, mushrooms, and cheese is just a start.

Meat Raviolis fried in Olive Oil, with herbs and shallot
The pasta dough is very important. It has to stretch over the filling, stick to itself and hold up to a great amount of handling. After years of struggling with various recipes, I finally found one by Tyler Florence on the Food Network. My early batches of raviolis were made completely by hand, now I try to automate the process as much as possible. Currently I use a pasta roller attachment for my Kitchenaid. The Ravioli maker, is a cast aluminum rack of 12 holes surrounded by zigzag  borders, with a corresponding piece of plastic with 12 dimples that stretches the dough enough to make pockets to put the filling in.
The Kitchenaid pasta roller attachment will make a long sheet of pasta that fits over the ravioli maker's rack, The plastic tray fits over the rack, making dimples in the dough, fill the 12 dimples, then cover the rack with another sheet of pasta, run a rolling pin over the assembly. The pressure from the rolling pin, pinches the dough together , cutting it on the zigzag borders, making 12 raviolis.
  All of the automated equipment isn’t necessary , dough can be made by hand, and rolled out with a rolling pin or hand cranked pasta machine, dollops of filling can be laid out on a sheet of pasta on the counter, the second sheet can be laid on top of the other and the dull side of a butter knife can be used to press and cut the dough.

When rolling out the dough, keep in mind that the dough is doubled over, so to keep from minimizing the taste of your filling, keep the dough as thin as possible.

Whatever filling you decide to make, take into consideration that the filling is surrounded by dough, so often times it pays to over season the filling, especially meat filling that’s also going to be served in a bold sauce.

Sauce can be homemade, store bought, or fixed up store bought. Red sauce is traditional, but for variety consider, a pesto sauce or in the case of sea food ravioli, try an alfredo, white wine or cheese sauce . One of my favorite ways to enjoy homemade raviolis is with no sauce at all. In a large pot of lightly salted boiling water drop frozen raviolis, most will sink, when they start to float they are getting close to done. In a large fry pan, sauté some shallot, maybe some mushrooms in a healthy dose (more than you’d typically use) of Extra Virgin Olive Oil. Off to the side have some chopped herbs (Italian Parsley, Oregono, Rosemary, sage Garlic) Once the raviolis are close to done and the shallots are translucent, drain the raviolis and put them into the sauté. As the raviolis start to crisp up, put your fresh herb mix in the pan and finish cooking to the desired brown, crispness. Serve with shredded parmesan cheese.

Dough Recipe:
http://www.foodnetwork.com/recipes/tyler-florence/pasta-dough-for-ravioli-recipe2

Raviolis keep very well frozen – care must be taken that they don’t break!
I have this odd piece of Tupperware the top and bottom are the same depth, it’s wide and shallow enough to hold 20 raviolis in a 4 x 5 grid, I use the thin plastic sheets used as semi-disposable cutting boards, that I cut to fit inside the container. I put 20 raviolis down, a sheet of plastic on top of them, another 20 and another plastic sheet – I can fit 140 Raviolis (12 dozen less 4) in the container and freeze them. A handy way is to lay the raviolis out on a cookie sheet, freeze them individually (if they stick to the cookie sheet, just gently drop the cookie sheet from a inch or two above the counter)  then store them in a resealable bag or plastic ware. 

Meat Filling
Meat Raviolis fried in Olive Oil, with herbs & shallot, Parmesan
1 ½ lbs Ground beef
4 table spoons minced Italian Parsley
2 table spoons minced Rosemary
2 table spoons minced Oregono
2 table spoons minced Sage
2 table spoons chopped garlic
½ to 1 cup red wine
¼ cup Worchester sauce
Salt & pepper to taste
Brown the meat in a large skillet (do not pour off the grease), add the remaining ingredients. Continue to cook the meat until the liquid disappears, continue to stir the meat mixture until it becomes dry and starts to brown. To make the ground meat easier to work with I run it through a food processor chopping it finely.

Sunday, December 5, 2010

Homemade Granola

Even people that don't like Granola like this!

The BEST part of of Homemade Granola is that you modify the recipe to suit your taste.
It's very simple to make and keeps fresh on the shelf for about a week. Eaten dry or in milk.

3 Cups Oatmeal Old Fashioned Slow Cook style
1 Cup Nuts - your favorite
1/4 Cup Vegetable Oil
1/4 Cup Brown Sugar
1/4 Cup Maple Syrup
pinch of salt
1 Cup Raisins

Mix Oats, Nuts, Oil, Sugar and Syrup in a bowl, spread out on large cookie sheet that's been sprayed with non-stick spray, and bake @250 for 1 1/2 hrs - turning every 20 minutes.
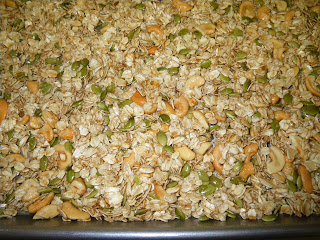
Oats, Cashews, Pumpkin Seeds - Golden Raisins were added later
Let cool and add 1 cup Raisins
Keep in Zip lock bags.

For Taste Sake
Oatmeal - The Old Fashioned Oatmeal will give you the largest flakes - the only difference between the Old Fashioned  Oats and the Quick Cook is that the quick cook has been cut into smaller pieces.

The nuts can be anything you like, Cashews work well as does Walnuts, Pecans, Almonds, etc. This process toasts the nuts - improving the flavor. If you use salted nuts then you can omit the pinch of salt.

Seeds can also be used, Pumpkin, sunflower (without the shell), etc. Raw ones can be added 1/2 or 3/4 the way through the toasting process - depending on their size, or if they're  already toasted - add them at the end with the raisins.
 
Adding Raisins - my favorite for this granola is the Golden Raisins (made from White or Green Grapes), the regular raisins go good, as well as craisins (dried cranberries) or any dried fruit you prefer.

The Syrup used is the standard "Maple Flavored" - REAL Maple syrup does kick it up a notch!

Serving suggestions - Dry, in milk, in yogurt, over ice cream, with berries or pomegranate seeds, roll a ball of peanut butter in the granola then dip in melted chocolate.

Sunday, November 21, 2010

Thanksgiving Turkey Cookies

Side by side the small Turkey sort of looses it's "OOMPH" next to the large Turkey Cookie, but let me assure you - by itself the small Turkey Cookie ROCKS!
There’s no cooking involved in making Turkey Cookies – the most difficult part of making them is the shopping! The main body of the turkey is Nabisco Pinwheels, a cookie topped with marshmallow covered in chocolate with a hole in the middle. The base can be any small round chocolate cookie, it can be any generic chocolate cookie, or something like Keebler Fudge covered Cookie or Fudge covered Oreos. You can even bake your own chocolate cookie for the base. To make the big turkey cookie you’re going to need another larger plain chocolate cookie at least an inch in diameter larger than the Pinwheel. Check your grocery store’s bakery department, you may have to bake your own. The head/beak and feet (and feathers for the Large Turkey Cookie) are standard Candy Corn, the hard part is finding it after Halloween.If you have time for mail order between Halloween and Thanksgiving then Mail Order Candy Corn is probably your freshest and most convenient choice.Check your local Grocery, Drug & Specialty stores etc. If you have a "Sweet Factory" store in town is a sure bet and the candy is fresh but it'll be your most expensive option.

1 Pkg. Nabisco Pinwheels (12 in a pack)
1 dz. Small Chocolate cookies
36 Perfect pieces of Candy Corn
1 tub Chocolate Cake Frosting
For the large Turkey Cookie – You’ll need:
12 Large Chocolate Cookies
Additional Candy Corn

 Using a butter knife, fill the hole in the Pinwheel with chocolate frosting. Use frosting to cover any spots on the Pinwheel that may have become damaged. 


Place a gob of frosting on the side of the Pinwheel in between the raised part of two swirls, that will give the cookie a slight bit of stability. Place the Pinwheel, vertically, frosting gob down, on the far edge of a small chocolate cookie. 

 Take 2 pieces of candy corn and push the white pointy side first into the frosting gob between the Pinwheel and the base cookie. If you have any candy corn that's missing the white tip, this is the time and place to use them. The candy corn 'feet' also add stability to the Pinwheel from leaning forward. Next place a small gob of frosting at the top of the Pinwheel. Place the 'head/beak' piece of candy corn in the top gob of frosting, white tip facing out, with the corn sitting up on it's side.

To make the Large Turkey cookie


Use a serrated knife to flatten one side of a large chocolate cookie and a small chocolate cookie to give some stability. When assembling, the flat spot on the large cookie should rest flat on the counter and the flat spot on the small cookie should butt up against the large cookie. 

Frost the outer edge of the large cookie, then frost the back side of the Pinwheel. Center the Pinwheel on the large cookie leaving the height of the small cookie between the bottom of the pinwheel and the flatspot on the large cookie. Place the candy corn all along the outer edge of the large cookie. Place a gob of frosting at the base of the Pinwheel and set the Large cookie, candy corn Pinwheel assembly on the small base cookie. The flat spot of the large cookie should rest on the counter and the flat spot of tyhe small cookie should press horizontally against the face of the large cookie  Finish by shoving the two 'feet' candy corn in place and a small gob of frosting at the top and placing the 'head/beak' candy corn in place.

Friday, November 19, 2010

Garlic Mashed Potatoes

Garlic Mashed Potatoes are one of my specialties – it’s an often requested side dish that I bring to family dinners.
Some people like mashed potatoes that have chunks of potato in them, or those made with the skins.When I want traditional garlic flavored mashed potatoes. I want mashed potatoes that are fluffy, creamy, buttery, garlicky, and well seasoned with salt. I want the type of mashed potatoes that can be eaten without gravy. The gravy is just a nice addition.

I’ve made as much as 20 pounds for a big Thanksgiving dinner. Let’s start with Five pounds, a good sized start for a family dinner. Adjust the recipe as your needs dictate.

5 Pounds of Russet or Idaho Potatoes - flaky baking style potato (not waxy potatoes like Red, or Yukon Gold etc.)
2-3 Tablespoons Salt
1 Cup Cream, or Milk, or Chicken Broth (your preference)
1 Stick Butter


Make the Garlic Paste First
As a rule of thumb start with one head of garlic per pound of potatoes, this will be more than necessary, but you’ll be adding it to taste so any overage can be used in another dish.

The garlic paste can be prepared ahead of time -mashed garlic can be kept in the refrigerator for more than a week.
Peel the garlic. For large amounts, I use a Garlic Peeler. There are several types out there, I use a silicone tube style Garlic Peeler. The clove goes in one side, pressure from your hand rolling it on the counter, cracks the dry skin and either removes it completely or makes it easy to remove. Get a system going, break the heads into cloves, put the cloves in one spot on the counter, the peeler in the middle and finished cloves on the other side. Tiny cloves aren’t worth keeping and peeling, toss them. Once the cloves are peeled, cut the little stem end off. These little particles can ruin the look of your mashed potatoes. Again get an assembly line going, one side of the cutting board have untrimmed cloves, and finished cloves placed on the other side.

Pre-Peeled garlic can be purchased – one head of garlic has an average of 15 good sized cloves – purchase accordingly.
Once the cloves have been peeled and trimmed. Roast them by placing them in a large frying pan that has a lid. Put enough vegetable oil the pan to lightly coat all the cloves. Stir or toss, to completely coat the cloves with oil. On a low heat, roast the garlic stirring or tossing regularly, until it becomes translucent. Raw garlic can be very strong, the longer the garlic is cooked the mellower and sweeter it becomes. Cooked down correctly, the garlic can become so mellow that it can be eaten straight. A bowl of mashed garlic is not out of the question. I’m assuming you wouldn’t be reading this recipe if you didn’t like the flavor of garlic. By roasting the garlic in the pan we’re trying to achieve a balance between the harsh raw and the mellow flavor that would be lost in the mashed potatoes. Once the cloves have become translucent, turn off the heat and mash the garlic with a fork or a flat hand operated potato masher. I’ve put the garlic in a blender or food processor but they mash it up so fine that the garlic flavor gets lost in the potatoes. Mashing the garlic by hand leaves some of the plant fibers intact, leaving small flavorful chunks of garlic in the potatoes and yields a much more flavorful result. 

Making the Potatoes
Peel the potatoes and remove any eyes. If the potatoes are large, cut them into evenly sized chunks. Similar sized chunks will ensure that they cook evenly. Making them smaller will allow them to cook quicker.

In a pot large enough to hold the potatoes and water, put in the potatoes, and cover them with cold water. Make sure there’s enough space between the water level and the top edge of the pot to allow for the water to boil. I like my water salted. I believe the flavor is far better when the potatoes absorb the salt as they are being cooked, than trying to add salt after they’re cooked. I sprinkle enough salt that would lightly and completely cover the bottom of the pot, approximately 2-3 tablespoons.
Bring the potatoes to a boil then turn the heat down to just enough to maintain a good boil. Boil the potatoes until fork tender – a fork should be able to sink ½ way into the potato with equal amount of effort (no hard center). Removing a larger chunk to a cutting board, cutting it in half and sampling the center is another way to check for doneness. When the potatoes are fully cooked, turn off the heat, and pour the potatoes into a colander in the sink to drain.
Put the butter and cream in the bottom of the pot you just used for cooking. Using a mixer to whip the potatoes, gradually put  the potatoes back in the pot adding more as the ones in the pot become whipped.. If a large batch of potatoes is being made, it can be helpful to work in batches, then mixing the batches together at the end. Be thorough with the whipping process – especially if you don’t like lumps. Uncooked potatoes and not spending enough time mixing are the two leading causes of lumpy mashed potatoes. Near the end of the whipping process, add the garlic paste, one heaping tablespoon at a time, integrating it thoroughly, stopping to taste test it every one or two tablespoons. When the flavor is to your liking, serve.

For Taste Sake
Avoid garlic that has sprouted - the sprouts can be bitter and will leave little green flecks in your otherwise white mashed potatoes.
If any of your cloves become scorched or overcooked in the roasting process - remove them - they'll be bitter.  

Sunday, October 10, 2010

Caprese Salad

This is a very simple Italian salad – fresh mozzarella cheese, fresh tomato and fresh basil leaves, often seasoned with only salt and pepper. This is the classic that you often see fanned out on a plate, repeating slices of white mozzarella, red tomato, green leaf of basil. The Italian flag’s colors are Red, White and Green. Don’t lose sight of its simplicity – the creaminess of the mozzarella, the slight acid of the tomato and the spiciness of the basil is a classic that has stood the test of time – try it in all of its glory. Don’t be afraid to serve it in all of it’s simplicity.
Now if you know me I’m not one to leave things alone, so here are some variations I like to add. My favorite way of serving it is, as a slice of tomato as the base – I often try to get a large heirloom tomato. I believe heirloom tomatoes have such a variety of colors, sizes and flavors that commercially grown tomatoes can’t offer. I often like to add a thin slice of cucumber – either a standard green cucumber or my all time favorite is a lemon cucumber. Mozzarella cheese is simplicity, but I am finding variations – especially marinated in olive oil or flavored olive oil. Mozzarella can also be found in small cherry tomato sized balls. Topped off with, or hidden in between a layer – a fresh basil leaf. Sprinkled with fresh ground black pepper, I like to use coarse Kosher salt or even a Pink Salt or Gray Salt – which typically has less of a ‘salty’ taste and adds more a ‘mineral’ taste. Drizzle some Extra Virgin Olive Oil over the top. Drizzle some Balsamic Vinegar over the top. Experiment with different balsamic vinegars, one of my favorites is Fig Balsamic Vinegar.
By making individual stacks, and serving them as stacks, your guests will find it easier to select a stack, cut and eat your gorgeous salad.

For Taste Sake – a slice of tomato, a leaf of basil, a small ball of mozzarella cut in half and two marinated mussels (recipe from an earlier post). Slice it in half, between the mozzarella and mussels and put the whole slice in your mouth – the flavors and textures, go on for some time!
Another variation would be to serve it as an appetizer. Take a bamboo skewer and cut it down to size, slide on cherry tomato, a small ball or cube of mozzarella, a leaf of basil, and maybe a marinated mussel. Serve them soaking in the herb dressing posted earlier, in a shallow dish.


Sunday, September 26, 2010

Marinated Mussels

I came up with this recipe many years ago when I ran across an awesome sale on mussels and wanted to extend the joy! They make a wonderful Appetizer/hors d'oeuvres as well as a decadent snack. They keep in the refrigerator for a few months (IF they last that long!)

1 Batch (basically 1 cup) Herb Salad dressing
2 Pounds Steamed Mussels
2 or more cloves Elephant Garlic

Start with the Herb Salad Dressing, posted earlier.
The mussels are best if fresh, but they are not always in season - they are commonly available frozen and when cooked according to the directions, are very suitable.
If you are using fresh mussels - make sure they are all alive (shell tightly closed - with those that are slightly open - tap another against it's shell, if it doesn't close, throw it away.) Rinse the shells to remove any loose debris and remove the beards - the beards are the fibers that the mussel produces to attach itself to rocks. Take a dull butter knife and pinch the fibers found along the seam of the shell, between the knife and your thumb, and pull the fibers away. If you are using frozen mussels - check for a beard, but most I've come across have the beard already removed. Steam the mussels until they open, Discard those that won't open - they were dead (you don't know for how long or from what - you only want to eat the ones that were healthy). Remove the meat from the shells, use a dull knife to scrape off the muscle that adheres the meat to the shell.

I like to layer thin slices of Elephant Garlic and mussel meat, in the marinade. Sliced shallot, small button mushrooms, sliced or quartered larger mushooms make great additions. I use a quart size canning jar to store the marinated mussels in the refrigerator. An empty mayonnaise  jar or other or similar container will also work. Periodically holding the jar horizontally and "rolling" it in your hands will mix it well. The mussels can be eaten immediately. At that point they are simply coated with the salad dressing, after about a week the marinade will start to penetrate and enhance the flavor.

 A Mandolin Peeler makes short work of slicing the Elephant Garlic.

 For serving - They can be eaten straight from the jar, I like to place a slice of Elephant Garlic on a cracker then a mussel on top. They also make an awesome addition to a Caprese Salad.

Monday, September 20, 2010

Herb Salad Dressing


I ran across this simple and delicious herb salad dressing a long time ago. It’s one of my favorites. It's equally at home on a green salad as it is on a pasta salad. It can be quickly made and used immediately, but comes to full flavor if left to sit overnight. It can also be used as a marinade for Chicken, Beef, Pork, and Sea Food.

3/4 Cup Vegetable Oil
1/4 Cup Apple Cider Vinegar
1 tsp dried Sweet Basil
1 tsp dried Dill Weed
1 tsp water
1 tsp Soy Sauce
1 Tbsp Honey
1/2 tsp geound Cayenne Pepper
1 large or 4 small cloves of Garlic, pressed
Combine all ingredients, shake well before using.


For Taste Sake
Change up the ingredients - try using some of the wonderful flavored vinegars and oils available. Red Wine vinegar can give it more of an Italian style. Try using tarragon flavored vinegar on a salad with chicken or chicken marinade.

Wednesday, August 25, 2010

Grilled Sweet Corn Salad

This is a wonderful summer time salad made with fresh ingredients, having the brilliant flavors and colors of summer. This salad needs no dressing, and little if any salt and pepper. It travels well and keeps in the refrigerator. It's tasty when the corn is still warm but can easily be served chilled.

Ingredients
2 large or 3 medium ears of fresh sweet corn
1/2 Can Black beans rinsed and drained
2 to 3 tablespoons chopped cilantro leaves
1/3 cup cubed feta cheese
1/3 cup minced onion
1 Cup Cherry Tomatoes cut in half
1 Firm Ripe Avocado cubed


Directions
Remove the husk and silk from 2 big or 3 medium ears of sweet corn.
Grill the ears on a BBQ over a medium high heat turning the ears to achieve a nice even browning
Cut the kernels off the cob using a sharp knife
Add black beans, cilantro, avocado, onion feta cheese and gently toss.


For Taste Sake
For the onion use: Torpedo Onion, Green Onion, or Shallot.
A damp paper towel, rubbed along the corn’s kernels helps remove the silk.
Cut the kernels from the cob using the sharpest, thinnest fillet/boning knife you have – a dull knife will pop the kernels and give you mush.
It’s easiest to cut the kernels off from the tip of the cob to the stem.
A tea towel laid down under the stem will keep kernels from flying all over the kitchen when cut, a shallow rectangular baking dish, or a small inverted bowl placed in a larger bowl will also contain the kernels as they are cut.
When traveling I leave cutting and mixing the avocado, tomatoes, and maybe the Feta until I arrived at my destination.

Wednesday, July 14, 2010

Fred's Famous Breakfast Pizza

Breakfast Pizza!

Caramelized onions, Scrambled Eggs, Italian Sausage, Pepperoni and sharp cheddar cheese on a fluffy garlic bread!!!

Background;
Many years ago Breakfast Pizza was quite a novelty. I still remember my first one – some folks at work heard that a local pizza shop was making them and they delivered. So one Friday morning we chipped in and ordered one. Quite frankly once I got the concept I thought I could do better, so I set out to make a better Breakfast Pizza!

This recipe makes a big pizza – about 14” x 1 ½ to 2”. When I’m in the mood for breakfast pizza I’ll make it the night before, let it cool, wrap it completely in plastic wrap, put it back in the pan and into the fridge. It travels well if, when you make it, you spread the cheese to the edge. When the cheese melts it keeps everything else in place. At work I’ll find a piece of cardboard, place the pizza on it, open the plastic wrap, slice the pizza into pieces (grab my piece!) then cover with plastic wrap. My coworkers can then microwave their piece individually – about 35 seconds.

Recipe
 
 My early breakfast pizzas were made with the dough from a bread machine, the machine had a “Manual” setting which mixed the dough then stopped, and didn’t bake it  into bread. I now make the dough with my Kitchenaid.  A dough recipe is included at the end of this recipe.

Oil a deep dish pizza pan (I use a 14” diameter x 1 ½ high pan ) with vegetable oil (not olive oil) place dough in pan - flip dough over – stretch it to the edge of the pan, and cover with plastic wrap (doesn't need to completely cover pan) - I stretch the plastic wrap tight –so I can watch it rise towards the plastic wrap - place in warm draft free place for about an hour.

While the dough is rising:
Caramelize a large onion – cooking down an onion brings out the natural sugar in it. Slice the onion into small slices, place in a heated well oiled skillet, as the onion cooks down, turn down the heat every so often until they are limp and browned, you can “cheat” a little by sprinkling some sugar over the onion half way through the cooking process.
Brown 1/3 to 1/2 lb of sausage, I’ll cut a 1 lb breakfast sausage into 3rds or a 12oz chub in half and freeze the remainder. Brown until dry & crumbly.
Scramble 3 eggs, I like to season with salt & pepper – scramble until dry and crumbled.
Grate 1.5 cups cheese. Almost any cheese will do – I prefer a sharp cheddar.

 I put the onion, egg, sausage, sometimes mushrooms, pepperoni and whatever else I'm in the mood for, on the dough. I top with cheese, making sure it’s spread enough to secure all the toppings when it melts. Bake at 400 for about 15min or until the cheese is melted and crust is slightly browned. It’s a good idea to rotate the pizza half way through.

Dough Recipe

Here is the Kitchenaid recipe for bread:
Using the Dough Hook.
This makes a big Pizza - I use a 14 1/2" pan
1/2 Cup Low-fat milk
3 tablespoons sugar
2 teaspoons salt
3 tablespoons butter
2 pkg Dry Yeast or 4 1/2 teaspoons of jar yeast
1 1/2 Cups warm water 105-115 degrees
5-6 cups bread flower or all purpose flower

Put milk, sugar, salt & butter in small saucepan - heat on low till butter melts & sugar dissolves - cool to lukewarm.

Dissolve yeast in warm water in warmed mixing bowl. Add lukewarm milk mixture and 4 1/2 cups flower - mix on speed 2, when mixed add remaining flower 1/2 cup at a time, until dough clings to hook and cleans sides of bowl - continue to kneed for another 3 minutes (now is a good time to add spices- while kneading)

If  I REALLY wanna kick it up - I add about a tablespoon (or two) of Garlic Powder, Italian Seasoning, Caraway, Fennel & Dill seeds - It's pretty spicy for "White-Bread" people.

Wednesday, June 2, 2010

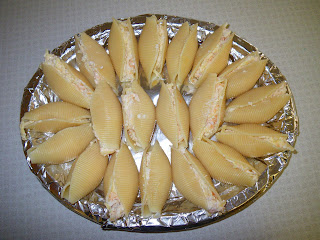
Sea Shells - Jumbo Pasta Shells - stuffed with Shrimp, Crab & Swiss Cheese!

This is one of my favorite hors d' oeuvres to make, and eat!


This appetizer is WONDERFUL on so many levels, first and foremost they are delicious, quick and easy to make, have eye appeal, can be made ahead, and they are served chilled.

I often keep a box of Jumbo Pasta Shells, cans of tiny shrimp and canned crab in my pantry at all times. I usually have at least 2 or 3 of the remaining ingredients: shallots, Swiss cheese, celery and mayonnaise in the refrigerator, so I may only have to go out for one or two of the ingredients before I can whip this appetizer up on short notice.

Makes about 20
 

Ingredients
1 box Jumbo Pasta Shells (16 oz.)
1 can tiny shrimp, drained approx 4.5 oz
1 can crab meat, drained approx 6oz
8oz (1/2 lb) shredded Swiss Cheese
1/2 Cup Mayonnaise
2 tablespoons thinly sliced celery
2 tablespoons chopped shallot

Stuffing Mixture

Place the Shrimp, Crab, Cheese, Mayonnaise, Celery, and Shallot in a bowl, then gently mix the ingredients together, trying not to mash it all together.
Cover the bowl and refrigerate while cooking the shells.

Cooking the Shells

Boil an adequate amount of water - approximately 6quarts, add salt, approx. 1/8 cup.
Add the shells to the boiling water, making sure they all become submerged quickly to ensure even cooking.
Gently stir the shells every so often, making sure they don't stick to the bottom.
To test for doneness: Pull out a shell, with the edge of a spoon or a knife blade snip off a piece of pasta and make certain that it's fully cooked, not “al dente”.

Stuffing the Shells

When the shells are fully cooked, drain them in a colander, and rinse in cold water, to stop the cooking process and to cool them to a comfortable working temperature.
Put the shells back into the pot used for cooking them, and add enough cold water to cover them half way, this keeps them moist while stuffing them.
Choose the best shells – some will have broken in the cooking process and there'll be some excess.
Remove a shell from the pot, and shake off excess water. Hold the shell open with one hand, and scoop about 1 tablespoon of your mixture into the shell. Form the shell into a natural shape and place on the plate.
When you’ve used up all of your stuffing mixture, cover the dish with plastic wrap to prevent them from sliding around and from drying out. Refrigerate until it’s time to serve them.

Tips
One annoying part about bringing a dish to a get together - is after it's over - remembering to retrieve your dish! I've lost some dishes that way! My solution - if it's not a really fancy occasion is to take a sturdy paper plate - the oval ones are my favorite. Cover it in aluminum foil and you have a semi fancy serving dish that's disposable. Placing another inverted dish on top, makes them ready to travel.

Put the leftover pasta in a baggie, later on, put pasta sauce over them and microwave, for a quick meal.

Sunday, April 18, 2010

Clam Fritters


Background
In my younger days I’d study the Tide’s Tables, when there was a low tide in the winter during daylight AND on one of my day’s off – I’d head to Tamale’s Bay near the Point Rey’s National Park to an area called Lawson’s Landing. I’d arrive early, sometimes with my crab nets to throw off the pier and fishing rods to catch whatever would bite. At the proper time my friend & I (or at times by myself) would hop in my kayak and as the tide went out – head to the emerging island(s) out in the bay, beach the kayak and dig for the famous “Horse-neck clams’ they were huge! Each clam weighed about 3 pounds and had a “neck” on it that could stretch about 3 feet – which meant the clam was 3 feet deep in the sand and mud. If you’ve ever dug a hole in the sand at the beach you know that you’d only get so deep before the hole collapsed in on itself. I had a 3’ x 16” piece of PVC pipe that I’d shove into the sand. Shovel sand out of it, push it down, and shovel some more – by time it was completely buried – I’d found my clam! The limit was 10, so on to the next one! By time the tide came back in I had 30 pounds of clams! LOTS of material to make all kinds of epicurean delights with – mostly a killer clam chowder and clam fritters! That was many years ago!
Recently my wife came home with a package of Razor Clams – thinking “They look cool, and Fred can probably make something yummy with them’. Well they stayed in the freezer for a little while, then came the time to cook them, my mind sifted thought the possibilities and I settled on an old recipe of mine – Clam Fritters – would these new clams prove suitable? – the verdict YES!

Recipe
Clam Fritters

I’ve only made these with Horse Neck clams and now Razor Clams (I can’t guarantee results with other species of clams)
I grind up the clam meat with a meat grinder attachment for my Kitchenaid, if you’re using a food processor – “pulse” it until you get a “rough chop” or if you don’t have a grinder or food processor, you can “mice” the clam meat to about 1/8” bits.
You’re looking for a 1:1 ratio of Clam meat to Cracker Crumbs
1 cup minced clam meat
1 cup cracker crumbs (crush them by hand in a bag – rough crush not “dust’)
1 egg
1 TBSP minced fresh Flat-leaf /Italian parsley (if you have to use dried ½ TSPB)
1 TBSP minced fresh ginger
1 TBSP minced fresh garlic
1 pinch salt (I like to use a “big grain’ salt like “Kosher” salt
1 pinch black pepper
Mix together to get a sticky mix – if it’s too lose add more cracker crumbs

Over a medium heat in a frying pan add enough vegetable oil to coat the bottom of the pan. When the oil is hot, form a golf ball size portion of the mixture – roll it into a ball then flatten it into about ½’ patty – drop into the oil and brown on both sides. Remove to a paper towel lined dish to drain. They are wonderful all alone but for variety, serve with dipping sauces of, Cocktail Sauce, Tartar Sauce, Sweet Chili Sauce, Teriyaki Sauce or a 1:1 mix of Mayo and flavored mustard (Wasabi, Dijon, Orange, Raspberry)
You can easily make these the day before and microwave or reheat in the oven, they freeze well up to a month.
Bon appetite!


-----------------------------
If you found the contents of this BLOG useful - any donation amount, will help contribute to the further development of this site - ALL donors will be redirected to a Thank You page where you can download a Free Electronic book "The Ultimate Chicken Wing Cook Book"