Wednesday, February 16, 2011

Fred's Famous BAM Chicken

BAM Chicken Thigh
This is one of my signature dishes, and a family favorite. It's delicious, with crispy skin, moist tender meat and it's very easy to make. We never tire of this treat.

First start with the BAM mix:
1 Part Paprika
1 Part Garlic Powder
1 Part Salt
1 Part Brown Sugar
For example 1/4 cup of each ingredient will give you 1 Cup of BAM mix.
Mix thoroughly, and store in a container - preferably one with a shaker top.

Next is the chicken - If you know how to debone a chicken - that's the first choice  (I'm putting the finishing touches on my video on how to debone a chicken and hope to post it soon). Second choice are thighs. You can use any parts you prefer or bake the chicken whole - I prefer those stand-up chicken rack for roasting the whole chicken.

Whole deboned BAM Chicken
Coat the chicken thoroughly with BAM mix. Line a cookie sheet that has sides, with aluminum foil. Place the coated chicken pieces, evenly spaced on the foil. Preheat the oven to 400 degrees and bake for 45 minutes.
The grease captured in the foil is perfect for making gravy.

For roasting the whole chicken - if you're using one of the stand up roasting racks (they allow all of the skin to get crispy) I remove one of the oven racks or put them all on the lowest part of the oven, making room for the stand-up chicken rack. I take a cast iron skillet and place the rack inside the skillet along with about 1/2 a cup of water - so that the grease doesn't burn if it overflows. Bake at 350, if we baked at 400, there's the possibility of burning the outside of the chicken before the inside is finished cooking. We lower the cooking temperature and increase the amount of time. The amount of time will be dependent on the size of the chicken, I would allow 1 1/2 to 2 hrs.  You should use a meat thermometer to check the temperature - stick the probe as deep as you can on the inside of the thigh, between the body and the thigh. The meat should reach a temperature of 165 degrees (check it in several places in that area - the LAST thing you want is under cooked chicken!)

For Taste Sake
For a different flavor variation - try making the spice mix with Smoked Paprika
I prefer using Kosher salt with big flakes instead of the standard, fine grained table salt.


Monday, January 31, 2011

Grumpypasto - Antipasto

Tired of the same old dips and appetizers? Try this hearty antipasto.
Grumpypasto with anchovy wrapped capers
This antipasto got it's name from my brother in-law's father, who was known by friends and family by the nickname 'Grumpy'. He was known for his cooking skill - this is his recipe, which is a family favorite. We lost Grumpy in 2008 but his memory lives on. I've kept the original recipe intact, just rearranged the list of ingredients to reflect the order of use - I've added my notes at the end. Enjoy!

1/8 Cup Extra Virgin Olive Oil
1 Carrot, peeled and sliced about 1/8 inch
1/2 medium onion, rough chopped
2 Celery Stalks, chopped
1/4 head Cauliflower Broken into small pieces
5 raw mushrooms, sliced into 4 pieces
1 small garlic clove, crushed and minced
6oz Chili Sauce (Del Monte/ Huntz)
1 tsp. salt
1tsp. Accent
1 (6oz) can solid pack white albacore tuna
3 oz marinated artichoke hearts and juice
Juice of 1/2 fresh lemon
12 Black olives, sliced in half
10 Green Olives, sliced in half (Spanish Style)
Capers and/or anchovies (few, optional)
7 oz ketchup


Put oil in 3 quart microwavable pot, add sliced carrots, stir; cover and cook on HIGH heat for 3 minutes.
Add chopped onions and celery, stir; cover and cook on HIGH heat for 2 minutes.
Add cauliflower, stir; cover and cook on HIGH heat for 2 minutes.
Add mushrooms, stir; cover and cook on HIGH heat for 2 minutes. Set aside.

In a large glass or stainless steel bowl, add ketchup, chili sauce, lemon juice, salt, Accent, and garlic, and mix well.
Add cooked vegetables, Mix; add well drained tuna, broken into pieces, olives, artichoke hearts (with juice), cocktail onions, and carefully mix again.
Can be eaten immediately but reaches full flavor after being refrigerated 1 to 2 days or more.

For Taste Sale
Being a Mediterranean dish - consider adding 2 or 3 tablespoons of fresh chopped Flat Leaf (Italian) Parsley.
Another Mediterranean addition - Feta cheese.
He mentions adding anchovies and/or capers - I found canned, anchovy wrapped capers. They are WONDERFUL - I place them on top of the mix after I've put it in the serving bowl.
A sign of our times - he calls for a 6oz can of solid Albacore tuna - all I could find in the store these days are 5oz cans - it's up to you weather to go with 5oz or buy a second can and use 1/5 of it in the recipe.
I don't add the Accent
Serve with a sturdy cracker, sliced toasted chunks of bread.


Thursday, January 27, 2011

Steamed Italian Lima Beans and Peas

This is a simple yet tasty recipe that can be made in 5 minutes. A great side dish for incorporating a variety of vegetables into your diet. This recipe is very flexible, increasing it's size would only increase the cooking time slightly, change the proportions (ex. 60% peas/ 40% Lima Beans) vary the onion (Green Onion, Shallots, Leaks).

1 cup frozen Baby Lima Beans
1 cup frozen Peas
Extra Virgin Olive Oil
Dried Italian Herb mix
1/2 Medium Onion rough chopped, separate the layers
Salt & Pepper

Place your steamer basket in a medium pot and add water to just below the basket bottom. place Peas, Lima Beans and onion in the basket, cover and boil for approximately 5 minutes. Onion should be translucent, taste a Lima Bean to make sure it's warm enough to eat. Once vegetables are done, remove basket and place vegetables in a bowl. Drizzle Extra Virgin Olive Oil over the vegetables, add  salt, pepper and dried Italian Herbs to taste, mix well and serve.


Sunday, January 9, 2011

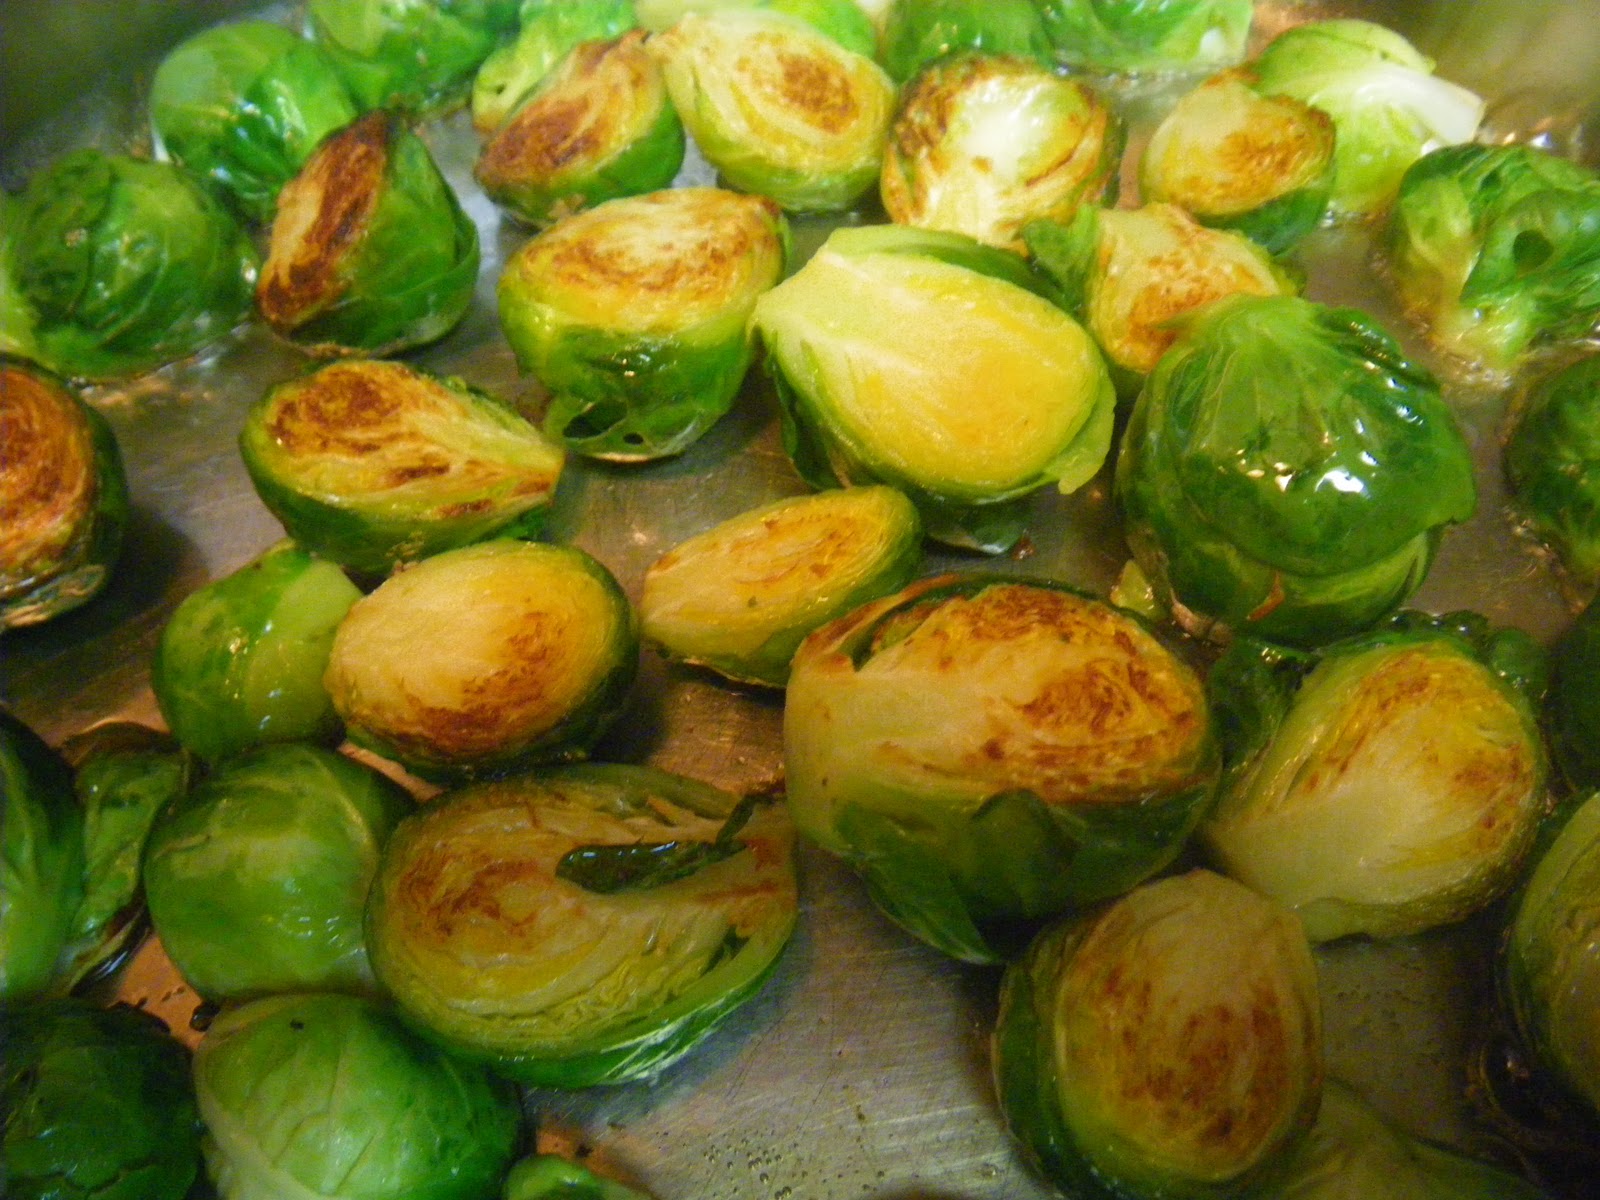
Brussel Sprouts

Brussel Sprouts - the mere mention of which can send people screaming off into the night!
I believe this stems from a bad childhood experience. When I was a child I was told

they were baby cabbages. Now what kid wouldn't enjoy eating kid sized cabbages?
If you're not a fan of Brussel Sprouts - approach this recipe with an open mind - it took me three years before I could convince my wife to let me bring them into the house and now this recipe is one of her favorite vegetable recipes! If you like Brussel Sprouts, here's a twist on most traditional methods of preparing them.

Fresh Brussel Sprouts - depending on size about 6 per person
1 Medium Shallot, pealed & minced
1/2 Carrot pealed and shredded
2-3 Tablespoons or more of Chopped Italian (flat leaf) Parsley
1/4 - 1/2 cup of chicken Broth
Butter & Olive Oil to generously cover the bottom of the pan.
Salt & pepper to taste - typically you don't need additional seasoning.


Start by 'cleaning the brussel sprouts - cut the stem end a bit shorter and remove the loose leaves, resulting from the cut and removing any discolored leaves.
Cut the brussel sprout in half lengthwise through the stem - aim for cutting one of the attached leaves in half through it's stem, accuracy isn't important but it helps keep the leaves intact through the cooking process,

In a large shallow fry pan, have enough Olive Oil & Butter (50/50 mix) to generously coat the bottom of the pan, medium-high heat. Once the Oil and Butter mixture is hot, place the 1/2 sprouts cut side down in the pan. A good method is to place them in a circle starting at the outer edge of the pan and work your way towards the center. This helps you keep track of how long the halves have been in the pan. When the sprout's cut side becomes browned, flip them over. They should brown in the approximate order that you placed them in the pan.

When all of the halves have been flipped over, add the rest of the ingredients (Parsley, Shallot, Carrot, and Chicken Broth) place the lid on the pan and let them cook until tender.
Enjoy!

For Taste Sake
A julienne peeler is a handy tool to shred the carrot, if you don't have one, you can use a conventional vegetable peeler. Use the peeler to produce long thin strips. Lay the strips on top of each other, cut the strips in half lengthwise then cut those halves lengthwise into as many strips as you can.

Chicken Broth can be replaced with a Chicken Bouillon and water mixture.

If you're not familiar with shallot, it's in the onion family, they are a small member of the onion family with a nutty flavor. Shallots are a bit more expensive than an onion. Onion can be substituted but the flavor will be a bit different.

I've tried to keep this recipe healthy. My brother in-law takes my recipe and puts a cube of butter in - how could you go wrong?


Sunday, January 2, 2011

Better Than Garlic Bread


Better than Garlic Bread. There's just SOME meals I have to have a good bread with - such as seafood. I used to reach for Garlic Bread on those occasions - homemade or store bought it was all good...... UNTIL I discovered this way of preparing, serving bread. Almost any bread will do but for the best results, pick a rustic artisan bread, one with small holes works best, my favorite is Puglasese made at a grocery store that we frequent. Next you want the very best Extra Virgin Olive Oil that you can find, a specialty salt like Pink Salt or Grey Salt, and a pealed clove of garlic.


Cut the bread in half lengthwise.


Toast the bread thoroughly (either in an oven, toaster oven or on a BBQ grill) I think toasted on a BBQ grill with grill marks is the most impressive with a little added kick of smoky flavor but it does require some extra skill to keep from burning the bread.

As soon as the bread is well toasted, take the garlic clove an rub it all over the exposed toasted inside of the bread. The toasted bread acts as sandpaper and the garlic will rub off onto the bread. Take special note of your and your guest's taste for garlic - don't over do it.


Next use a Silicone Brush to spread the Extra Virgin Olive Oil generously over the exposed toasted inside of the bread.


Sprinkle a pinch of Pink Salt or Grey Saltover the bread, slice and serve.


For Taste Sake
Pink Salt and Grey Salt aren't as salty as table salt - they have a 'mineral' taste to them - enhancing the flavor.

When you slice the bread in half, lengthwise, pay close attention to the edges of the bread, especially if you're going to grill it. Often times the bottom half is well proportioned but the top half's edge may be quite thin and subject to burning - it's a good practice to trim the thin edges back before toasting.

A Silicone Brush is best at spreading the Extra Virgin Olive Oil over the bread - the silicone will not leave any bristles on your food, will withstand high cooking temperatures, and cleans easily because the bristles will not absorb food.


Tuesday, December 28, 2010

Baileys Chocolate Chip Cheesecake

I'm not really a dessert person, but this cheesecake is sooo good it's my favorite dessert! It's my go-to dessert when I want to go all-out. It's rich, not too sweet, has the texture of a creamy cheesecake and the flavor of Baileys Irish Cream, chocolate chips and a graham cracker crust.
I'm not sure where I got this from, otherwise I'd give credit where it's due. This can be made ahead of time and keeps well in the refrigerator. This is much taller than your standard pie-sized cheesecake so it can serve a good sized party.

Crust:
2 Cups graham cracker crumbs (Each packaged 'Brick' of crackers is a bit over 1 cup each)
1/4 Cup Sugar
6 Tbsp. (3/4 stick) butter, melted

Filling:
2 1/4 lbs (4 1/2 - 8oz bricks) Cream Cheese, room temperature or microwave until soft
1 2/3 cups sugar
5 eggs, room temperature
1 cup Baileys Irish Cream
1 Tbsp. vanilla extract
1 cup semisweet chocolate chips

Cooking Instructions:
For Crust:
Preheat oven to 325F.
Coat 9" diameter springform pan with nonstick vegetable oil spray.
Combine graham cracker crumbs and sugar in pan.
Stir in butter.
Press mixture into bottom and 1" up sides of pan.
Bake until light brown, about 7 to 10 minutes.
Maintain oven temperature at 325F.

For filling:
Use electric mixer to beat cream cheese until smooth.
Gradually mix in sugar.
Beat eggs in one at a time.
Blend in Baileys and vanilla.
Scrape down edges of bowl and mixing blades, and remix to ensure consistent texture and flavor.

Sprinkle half of chocolate chips over crust.
Spoon in filling, taking care to not disturb placement of chocolate chips.
Sprinkle the remaining chocolate chips over the top of filling.
Bake cake until puffed, springy in center and golden brown, about 1hour 20 minutes.
Cool cake completely.


For Taste Sake:
Pay attention when assembling the springform pan - you want the 'lip' to face down so that you can slide the finished cake off of the disk, I actually assemble it with a piece of parchment paper in place, when it's cooled I can pull the paper and cake onto my cake stand, then slip an icing knife between the crust and paper, use the icing knife to hold the cake in place while I pull the parchment out from under the cake leaving just the cake on the cake stand.

Cake my crack when puffy, crack(s) will close as cake cools and shrinks. Some cooks prefer to place pan of boiling water in oven with the cake to keep humidity up lessening crack or wrapping the cake pan in aluminum foil, ensuring the bottom and sides are water tight, placing the cake pan, aluminum foil assembly in another larger pan,adding boiling water to the outer pan, then cooking. 

The bottom of a small cup or measuring cup can be used to press the crumb mixture in place and up the sides of the pan.

To top the cake:
Chocolate chips can be placed symmetrically on top of the filling before cooking, giving a nice presentation.


Coffee Cream Topping
1 cup chilled whipping cream, 2 Tbsp. Sugar, 1 tsp. instant coffee powder.Beat cream, sugar, and coffee powder until peaks form. Spread over cooled cake, garnish with chocolate curls.

Amaretto Topping
Dissolve 1 pkt. Knox Gelatin in 1/2 cup Amaretto and bring to a boil as it starts to cool it can be spread over top of cake while it's still in the springform pan it will cool to an translucent amber gel.

Monday, December 13, 2010

Homemade Raviolis

One of the best things about Homemade Raviolis is that you have complete control over how they’re made. There are three components to consider when making raviolis; filling, dough, and sauce.

The filling is limited only by your imagination. Meat, seafood, vegetables, mushrooms, and cheese is just a start.

Meat Raviolis fried in Olive Oil, with herbs and shallot
The pasta dough is very important. It has to stretch over the filling, stick to itself and hold up to a great amount of handling. After years of struggling with various recipes, I finally found one by Tyler Florence on the Food Network. My early batches of raviolis were made completely by hand, now I try to automate the process as much as possible. Currently I use a pasta roller attachment for my Kitchenaid. The Ravioli maker, is a cast aluminum rack of 12 holes surrounded by zigzag  borders, with a corresponding piece of plastic with 12 dimples that stretches the dough enough to make pockets to put the filling in.
The Kitchenaid pasta roller attachment will make a long sheet of pasta that fits over the ravioli maker's rack, The plastic tray fits over the rack, making dimples in the dough, fill the 12 dimples, then cover the rack with another sheet of pasta, run a rolling pin over the assembly. The pressure from the rolling pin, pinches the dough together , cutting it on the zigzag borders, making 12 raviolis.
  All of the automated equipment isn’t necessary , dough can be made by hand, and rolled out with a rolling pin or hand cranked pasta machine, dollops of filling can be laid out on a sheet of pasta on the counter, the second sheet can be laid on top of the other and the dull side of a butter knife can be used to press and cut the dough.

When rolling out the dough, keep in mind that the dough is doubled over, so to keep from minimizing the taste of your filling, keep the dough as thin as possible.

Whatever filling you decide to make, take into consideration that the filling is surrounded by dough, so often times it pays to over season the filling, especially meat filling that’s also going to be served in a bold sauce.

Sauce can be homemade, store bought, or fixed up store bought. Red sauce is traditional, but for variety consider, a pesto sauce or in the case of sea food ravioli, try an alfredo, white wine or cheese sauce . One of my favorite ways to enjoy homemade raviolis is with no sauce at all. In a large pot of lightly salted boiling water drop frozen raviolis, most will sink, when they start to float they are getting close to done. In a large fry pan, sauté some shallot, maybe some mushrooms in a healthy dose (more than you’d typically use) of Extra Virgin Olive Oil. Off to the side have some chopped herbs (Italian Parsley, Oregono, Rosemary, sage Garlic) Once the raviolis are close to done and the shallots are translucent, drain the raviolis and put them into the sauté. As the raviolis start to crisp up, put your fresh herb mix in the pan and finish cooking to the desired brown, crispness. Serve with shredded parmesan cheese.

Dough Recipe:
http://www.foodnetwork.com/recipes/tyler-florence/pasta-dough-for-ravioli-recipe2

Raviolis keep very well frozen – care must be taken that they don’t break!
I have this odd piece of Tupperware the top and bottom are the same depth, it’s wide and shallow enough to hold 20 raviolis in a 4 x 5 grid, I use the thin plastic sheets used as semi-disposable cutting boards, that I cut to fit inside the container. I put 20 raviolis down, a sheet of plastic on top of them, another 20 and another plastic sheet – I can fit 140 Raviolis (12 dozen less 4) in the container and freeze them. A handy way is to lay the raviolis out on a cookie sheet, freeze them individually (if they stick to the cookie sheet, just gently drop the cookie sheet from a inch or two above the counter)  then store them in a resealable bag or plastic ware. 

Meat Filling
Meat Raviolis fried in Olive Oil, with herbs & shallot, Parmesan
1 ½ lbs Ground beef
4 table spoons minced Italian Parsley
2 table spoons minced Rosemary
2 table spoons minced Oregono
2 table spoons minced Sage
2 table spoons chopped garlic
½ to 1 cup red wine
¼ cup Worchester sauce
Salt & pepper to taste
Brown the meat in a large skillet (do not pour off the grease), add the remaining ingredients. Continue to cook the meat until the liquid disappears, continue to stir the meat mixture until it becomes dry and starts to brown. To make the ground meat easier to work with I run it through a food processor chopping it finely.