Thursday, November 21, 2013

How to Make Kiwi Jam

Kiwi Jam
Kiwi Jam

Kiwi Jam is one of my favorite jams. This sweet chunky spread is wonderful on toast, waffles, and pancakes. I've had people make thumb print cookies with it, pour it over ice cream (hot or cold) and even top a pork roast with it.

 Kiwis typically ripen in the fall. I'm fortunate to live in an area where Kiwis are grown so I can buy 'seconds' at a Farmer's market to make my Jam. 'Seconds' are the imperfect ones that don't make it to the store - typically they're doubles or triples - the ugly ones - looks don't matter, because we're going to make Kiwi Jam.

I also make Pomegranate Jelly. Both Pomegranates and Kiwi ripen in the Fall, the Green Kiwi Jam and Red Pomegranate Jelly make a wonderful Christmas pair to give as gifts.

Ingredients:

3 Cups peeled & cut up Kiwi
5 cups sugar
3 drops green food coloring
1 pat of butter (eyeball it)
1 pkg dry pectin

Makes a little over 5 - 8oz Jars

Directions;

Add Kiwi, Pectin & butter to pan on med/high heat - stir often and bring to a good boil,
add 3 drops food coloring to sugar - add sugar, stirring into boiling kiwi mixture - stir & bring to boil for 2 minutes. Once it's brought to a boil take pan off heat and let cool for 3-5 minutes. Allowing the jam to cool will thicken the jam, which keeps the chunks of fruit from floating to the top of the jar. Ladle the hot jam into the jars to within 1/4" of the lip - this is known as head space.

Canning Instructions:

There are a few tools you may want to buy, some places sell them as a kit
Wide mouth funnel
Lid lifter (stick with magnet on end) lift hot lids out of water
Jar lifter (lower & lift jars in & out of hot water) the straight plastic parts are the handles - the curved pieces fit around the jar
there's a clear stick that may come in the kit for knocking bubbles out of pickle jars - you don't need it for Jelly/Jam)
Timer - or a watch

I start with 3 pans:
1 REALLY big deep one with enough water to cover the jars with at least 1" of water (be mindful not to put so much water that it would overflow if you add 6 full jars to it, bring to a boil then turn the heat down to just under a boil.
1 large shallow frying pan with about 1" of water - put 6 empty jars and the flat lids in it and put on med/low heat don't boil - the sealing compound on the lid could get damaged if you boil it.
1 3 or 4 quat or so pot for making the jelly.

Follow the directions above to make the Kiwi Jam.Once you've allowed the completed Jam to cool for 5 minutes and thicken, ladle the hot jam into the jars within 1/4" of the lip try to ladle an even amount of juice and fruit into each jar. Use a napkin with the corner wet from your boiling water to wipe the mouth rim of the jar (to remove any jelly that might keep it from sealing properly). Using your lid lifter, retrieve a flat lid from the heated water and place the lid on the jar, then screw on the ring band - only lightly  finger tight. Set the jar aside and fill another until you've put all the Jam into your jars. Any leftover jam can be put in the refrigerator and eaten soon, or if you're going to make another batch of Kiwi Jam immediately, put the jam in a clean canning jar and place that jar in your warming pan, ready to be filled with the hot jam from your next batch.

Place all jars in the big pot of water, it's best if you have some sort of rack for the jars to sit on, I've heard that some folks place a towel in the bottom, the jars are tempered which makes them strong but brittle, so there is the posability that they could crack if they bounce on the bottom of the pot - you could risk it if you cn't find a suitable rack - I use a round cookie cooling rack. Jars stay in the water bath for 10 minutes. With Lids on finger tight the hot water forces air out and creates a vacuum when it cools.

Place hot jars on a towel, or a wooden or plastic cutting board - NOT cold Tile, Granite or Marble counters! (again to prevent risk of jars cracking when hot meets cold). As they cool - you may hear 'pop' - that's the jars sealing. The next day check to see that jars sealed properly -the flat lid should be concave (sucked down). Pushing on the lid should make no movement - if lid pops up & down with finger pushing - you can just refrigerate and eat soon or remove lid, clean lid and jar rim, replace lid & band ring and try putting in waterbath for 10 minutes.

Store the filled jars in a cool dark place. They will typically keep for up to two years.


Monday, September 30, 2013

Mexican Pork Riblets

Mexican Pork Riblets


This is my all time favorite Pork dish. Tender fall of the bone pork, slow cooked in a flavorful Mexican sauce. This dish can be made with any cut of pork. I think it's best with riblets.
This can be served as a main dish or as an appetizer. If you choose to make it with boneless Pork, then this makes a wonderful taco or burrito filling.
There's a great deal of talk about peasant food - cheap, common food often raised to gourmet level. 'Riblets' are pork rib timings. When a rack of pork ribs are trimmed, especially when trimmed for Santa Fe style there's not much else that can be done with those trimmings, it's too much trouble to separate the meat from the bone, often the riblets are thrown away. Some places will sell them. Many people, myself included, think the flavor of the meat closest to the bone is better.

The Recipe is simple and the results are outstanding.
3 to 5 pounds or so pork cut into 1" cubes, riblets should be cut into pieces - cut between the bone
3 - 7.75 oz. Cans of El Pato Mexican Tomato Sauce
1 or 2 Tbsp ground Cumin spice
1 Medium to Large Onion sliced

Place the pork, onion, sauce and cumin in a Crock Pot, stir so that everything is coated in sauce. Cover and put on low for a minimum of 5 hours. When the meat can easily be pulled apart or pulled off the bone, they're done. You can turn the heat down to warm until it's time to eat.

I commonly will prepare everything in the removable crock, and put it in the refrigerator over night. In the morning, just before leaving for work, I'll put the crock in the holder and set it on low. Nine or so hours later, when I arrive home, the house smells delicious! It only takes a few minutes to prepare a side dish, and sit down to a delicious dinner.

If you're in a hurry - you can put everything into a large pot, add some broth (Chicken or Vegetable) or even water to thin out the sauce, turn the stove to medium high and stir ever 5 to 7 minutes until tender.

For Taste Sake
This can be served with the traditional refried beans and rice.
Another good alternative I enjoy them with is whole wheat angel hair pasta. This is one of the few dishes that is hearty enough to not get overpowered by the whole wheat pasta. Regular pasta is also a good side dish.

For children and those faint of heart you can control the heat by using only tomato sauce, or 2 cans tomato sauce to one El Pato, or 1 can tomato sauce to 2 El Pato. You can further increase the heat by adding chipotle peppers either finely minced or blended in.

You can also experiment with the amount of cumin you add to the dish, for those who really like the flavors of Mexican cuisine - you can easily add another tablespoon or two.

Just a note to be aware of the bones in this dish, when cooking for long periods of time the bones can begin to disintegrate, so chew carefully.


Wednesday, August 21, 2013

Summer Pasta Vegetable Salad

Summer Pasta Vegetable Salad - a tasty mix of Pasta and vegetables dressed in a wonderful herb vinaigrette dressing. I love 'lightening up' a pasta salad with vegetables and combining this with my favorite herb dressing.

 1 lb Pasta (screws, bow tie, shells etc.) cooked in salted water
1 Cup Broccoli tops cut into small pieces
1 Cup Cucumber, peeled, seeds removed, cut into chunks
1 Cup Mushroom sliced
1 Cup Carrot Shredded
1 Can Garbanzo Beans, drained
1/2 cup Onion rough chopped
1/2 Cup Sliced Radishes

Bring a pot of salted water to a boil, add the pasta to the water until cooked. Drain the pasta and run cold water over it to stop the cooking process. While the pasta is cooking, make good use of your time by cutting up the vegetables.
Mix the cold pasta and vegetables, I like to put about 1/4 cup dressing on the salad to keep the pasta from sticking together, then add the remainder of the dressing to the salad just before serving and toss.

Dressing
This dressing is equally at home on a green salad as it is on a pasta salad. It can be quickly made and used immediately, but comes to full flavor if left to sit overnight. It can also be used as a marinade for Chicken, Beef, Pork, and Sea Food.

3/4 Cup Vegetable Oil
1/4 Cup Apple Cider Vinegar
1 tsp dried Sweet Basil
1 tsp dried Dill Weed
1 tsp water
1 tsp Soy Sauce
1 Tbsp Honey
1/2 tsp ground Cayenne Pepper
1 large or 4 small cloves of Garlic, pressed
Combine all ingredients, shake well before using.

For Taste Sake
 The Onions can be Red, Green, Shallot
Additional items to add:
   Olives (Green or Black)
   Tomatoes Grape, sweet 100's or sliced
   Beans Kidney, Cannellini, Butter
   Sweet Bell Peppers


Tuesday, April 9, 2013

Thai Tilapia

Thai Tilapia - Like Thai Food but don't know how to make it at home? Do you like Tilapia but
you're tired of the same old recipes? Here's an easy to make, yet exotic tasting dish that you can make at home and wow your friends and family with!

Ingredients 
2 Large or 4 small Fillets of Tilapia (for 2 people - can be doubled with the same amount of ingredients - for more people add appropriate amount of listed ingredients)
1 Can of Coconut Milk
1 Green onion chopped
1 or 2 Tablespoons of Fish Sauce
4 large Basil leaves (Regular or Thai Basil)
2-3 Sliced Mushrooms
1 Schllot sliced (2-3 tablespoons of onion can be substituted
1 Jar Green Curry Paste

1 Cup Uncooked Rice

Start cooking the Rice First
Bring 1 1/2 Cup of water to a boil in a covered pot. Add 1 cup rice, stir, cover and lower the heat as low as it will go - just enough to keep it warm (it's best if you don't open the lid for 20 min or so.

In a large skillet (one with a cover is preferable but not necessary) pour the can of coconut milk in and start with a medium high heat. To keep from contaminating the curry paste, use 2 spoons, one to take the curry paste from the jar and tap it on the side of the skillet to drop the paste in the milk. Use the other spoon to stir the paste into the coconut milk. Add the Green Curry paste to taste - typically the Green Curry Paste is sweet but too much can still give you some heat! Keep adding paste and tasting the milk/curry mixture until it's to your liking. For reference I typically add around 3 teaspoons. Add the shallot, green onion, mushrooms, fish sauce, and sliced basil to the mixture, when it starts to simmer, turn the heat down to medium and add the fillets one at a time, making sure they get good contact with the mixture. As the fillets simmer, gently move them around in the pan to ensure they're all cooking evenly. When the fillets turn opaque/white all the way through - they're done! The rice should also be ready.

This dish can be served on a plate or in a bowl. Fish can be served beside or on top of the rice, spoon the vegetables and coconut milk mixture on the rice.

For Taste Sake
Basil is a delicate herb - it needs to be sliced or ripped just before you put it in the mixture, otherwise it will turn black while it waits to be put in the sauce.

Other fish can be substituted - Sawi, Basa, Perch, etc. thin white fish is best.

Peas, green beans or Broccoli make great side dishes.

This dish can also be prepared in the oven, in a Pyrex dish, 350 degrees.


Sunday, February 3, 2013

Fred's Famous Pasta/ Macaroni Salad

Fred's Famous Pasta/ Macaroni  Salad

This Pasta Salad also called Macaroni Salad is a family favorite. We like to eat it while out in the boat, or Wine Tasting. This easy to make salad, is top notch, full of flavor, yet easy to make and will keep in the refrigerator for several days.

You can cut the ingredients in half or make a double or triple batch according to your needs.

1 Lb. Small Pasta Shells
2 Cans Chunk Lite Tuna - drained
3 -4 Table Spoons Minced Shallot
Mayonnaise
2 Cups Frozen Peas
Salt for seasoning the water

Bring 4quarts of water to a boil and salt the water heavily (water should taste like the Ocean's salt water)
Pour the pasta shells into the boiling water, stir immediately, then ever so often. As the pasta gets close done, taste it, frequently. When it has reached firm but not hard 'Al dente'  - add the frozen peas. When the water begins to boil again, turn off the heat, remove the pot from the stove and drain the pasta and peas in a colander. Rinse the pasta and peas with cold water to stop the pasta's cooking.
Add the cooled and drained pasta and peas into a bowl or reuse the pot you just cooked them in. Add the two cans of tuna (fluff it with a fork), shallot, and mayonnaise. Mix thouroughly.

The pasta will continue to absorb the mayonnaise. Many times I'll make the salad, the night before. So I'll cover the bowl or pot and put it in the refrigerator for the night. Just before serving or putting into a container for travel, add more mayonnaise, possibly a little extra depending on how long before the salad will be consumed.

For Taste Sake
Some people like a little mustard in their pasta salad - a little dry, yellow, or brown 1 teaspoon to a tablespoon for a little extra flavor, or some horseradish for a bit of a kick.

A sliced hard boiled egg on top for presentation or chopped and mixed in can add additional richness and flavor.

Experiment with different pastas, screws, bow ties, medium shells etc.


Wednesday, September 19, 2012

Fred's Famous Fresh Salsa

The key to this recipe is the fresh ingredients - you can vary the recipe to your own liking. Experiment and make it your own.


Ingredients

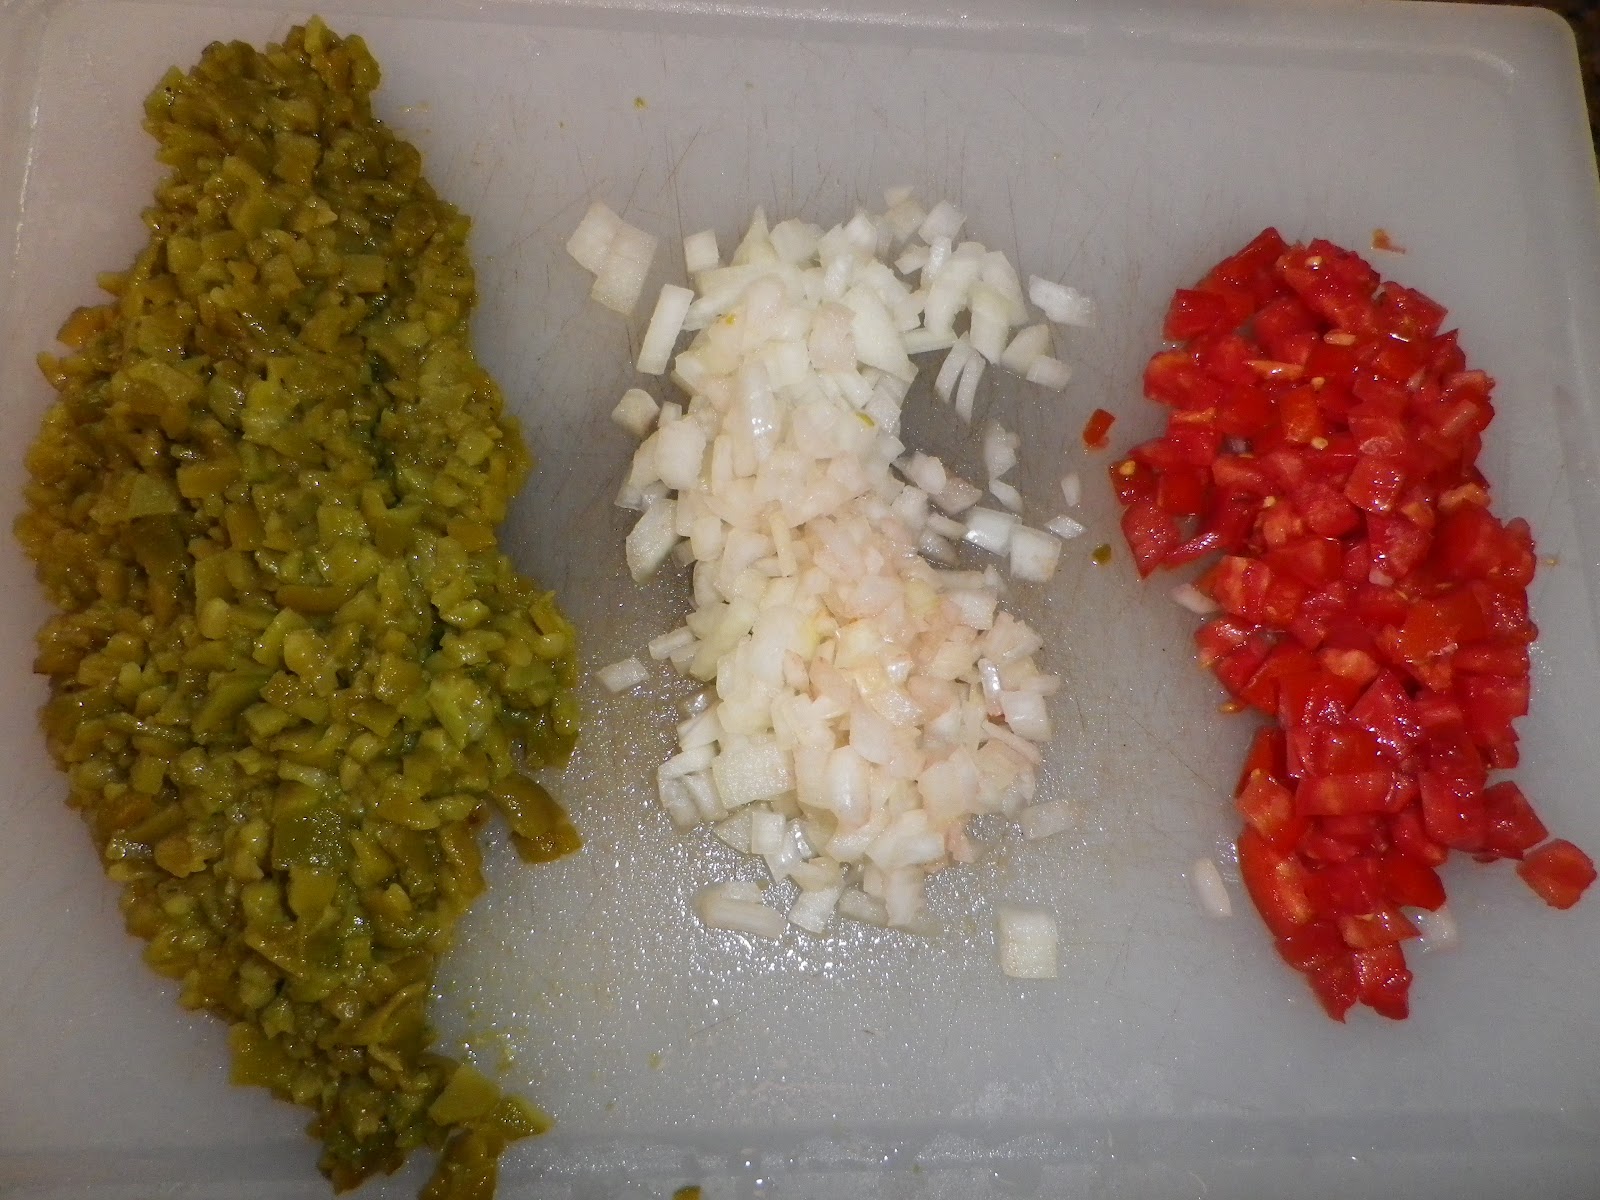
10 Chili Peppers (Anaheim, Sweet Italian, Banana,  Pasilla) - Roasted & peeled
1 Medium Onion - minced
4 Medium to Large Meaty Tomatoes (Beefsteak, Plum, Shady Lady, Better Boy) - diced
1 Bunch Cilantro - chopped
Coarse Salt, Cracked Pepper, Minced Garlic or Garlic Powder to taste

The peppers are the most time consuming aspect of this recipe - they can be prepared ahead of time and refrigerated.
The chili peppers have a very thin, very tough skin on them that should be removed. Some sort of flame makes it easy - BBQ, Gas Broiler, Gas Stove, Blow torch. The chilis can be roasted in an oven but it's not as effective. Place the chilis over direct flame and rotate them until the skin becomes charred and blistered as much as possible. Remove the peppers from the flame into a plastic or paper bag, close the bag and let them sweat, steam until they're cool enough to handle. The skin should now be easy to remove by hand.
With a sharp pairing knife, cut off the top of the pepper, slice it open from the opening to the tip and lay it open. Scrape out the seeds. If you are storing the peppers for later use, simply storing them in a bowl will result in a bowl of slimy peppers. I place a saucer upside down in the center of a medium or large plate. Stack the peppers on top of the saucer and wrap in saran, and store in the refrigerator. The slime will drain it's way to the under plate, away from the peppers.

I like this style of salsa rather dry and chunky. So I dice the Tomatoes, Onions, and peppers on the bigger side. Chop the Cilantro well, you can pull the leaves off and chop them, but you can also getaway with bundling it up tightly and cutting 1/8" slices off the bundle. Avoid chunks of stems in your salsa.

When dicing the tomatoes, I put the cutting board on a slant and let the juice run into the sink. I only use the meat of the tomato, discarding the seeds and juicy portion surrounding them.

So mix all the ingredients together, add salt, pepper (preferably fresh cracked), minced garlic or garlic granules or powder to taste. The salt will draw even more moisture from the produce - I like to drain the salsa when juice starts to accumulate. You don't have to throw the juice away - it's great in Bloody Mary's - I hear it cures hangovers
Serve with tortilla chips, over dishes like grilled Salmon etc.

For Taste Sake
Fresh minced garlic might be too much for some people - the Minced Garlic in a jar is less potent.
Experiment with different types of onions, Yellow, White, Brown, Red, Sweet Walla Walla, Maui, Torpedo) Torpedos are my favorite they can be spicy.
A great addition to this salsa is corn - either freshly cut from the cob or roasted first.
Fire roasted Tomatoes (like you did with the peppers) makes a great variation.

This salsa is at it's very best when made fresh but tomatoes and chili peppers aren't always available - you can experiment with canned chopped tomatoes (some are available with Italian or Mexican spices) and canned chopped chili peppers.


Friday, August 3, 2012

Sweet Bell Peppers with Mushroom and Onion Appetizer

Marinated Sweet Bell Peppers with Mushroom and Onion Appetizer Antipasto

Nothing says Summer like a Dish of Colorful Fresh Vegetables!
This easy to make, make ahead dish really brings out sweetness of the Bell Peppers.
This is a very flexible dish to make so don't get too caught up in the number of peppers vs onions and Mushrooms - I've even made it with only Mushrooms and Onions.

One or two each of each color Bell Pepper (Green, Yellow, Orange, Red etc.)
One Medium to Large Onion per 4 Peppers
6 to 12 small to medium Mushrooms per 4 Peppers
Good Extra Virgin Olive Oil
Balsamic Vinegar
Some Fresh Italian Herbs, or Dried Italian Herb mix

Wash the peppers, and with a sharp paring knife inserted into the top outer edge of the pepper, cut all the way around the outer edge, as if you're removing a Pumpkin top for cleaning. Grasping the stem, pull the core of the pepper out, removing a great deal of the membrane and seeds with it. Discard the core. Tapping the sides of an inverted pepper will remove most of the seeds, try to remove as many as you can, they are edible so you don't have to be 100% accurate.
Using a larger Chef's Knife, cut the peppers vertically into strips.

Remove the outer paper like skin of the onion, remove the top and bottom of the onion and discard the top, bottom and outer skin. Cut the onion vertically into fourths peel the center sections of the quarters away from the outer section about half way between, take the remaining outer sections and cut them in half vertically, making them the approximate size of the middle pieces. So ot slices are too big or too small.

Mushrooms are like sponges so we typically try to clean them without washing them - a goodt Mushroom Brush will accomplish this - brush off any loose material. Set the mushroom upside down on the cutting board and slice them into quarters.

These freshly cut vegetables could easily be served up with dip in this condition, not many people appreciate a raw onion, so we're going to add an additional depth of flavor.

We're going to sweat the Peppers and Onions. This can be done in an oven or in a pan on the top of the stove. Sweating the vegetables is simply applying heat until the plant's cell walls begin to break down and the slices become limp and the onion becomes translucent. Start by coating the vegetables with the olive oil. This can be done in any manner you like but I've found, tossing them in a stainless steel bowl to be the quickest and most efficient and probably the cleanest. Fill the Stainless Steel bowl no more than half way with vegetables, drizzle some oil on them and either stir them with a spatula, or grasp the bowl in one hand and flip them over and over like you've seen your favorite chef flip a pancake or a saute pan of vegetables. You can practice over the sink. You can add the Italian Spices at this time or during the cooking process. Now either lay them out on a foil lined cookie sheet, or into a skillet that has a top to it. A low to medium heat is best, 300-350 oven temperature. Peppers and onions will cook at different time and temperatures so I typically cook them separately using the skillet, or on separate cookie sheets, then you can pull them off the heat when they're done. Stirr them every so often to make sure they're all getting heated at the same time.
The mushrooms don't get cooked, they can be put in the stainless steel bowl with Oil, Balsamic Vinegar, spices and toss.

When the vegetables are limp, if you haven't already added the spices - do it now. Splash on the Balsamic Vinegar to taste. If you're going to serve the dish now - stir in the mushrooms and serve. If you're making the dish ahead of time, allow the vegetables to cool, add the mushrooms, and put into a container (a gallon sized ziplock bag works great).

This dish can last up to a week in the refrigerator, flip or shake the container daily to coat the contents and distribute the marinade.

For Taste Sake

The leftovers or the prepared dish can be reheated alone or added to a stir fry.

These are wonderful, served along side other appetizers, antipasto like sliced or cubed salami, cheeses, marinated artichoke hearts, anchovies, pickled peppers, and olives.
For Christmas time, consider using only Red and Green Peppers.